Getting Bluetooth modules talking to each other
Before we start, please note that most Apple devices don’t support the virtual serial link profile that these modules use.
A really easy method of making your projects wireless is to use serial Bluetooth modules, these modules take standard serial data and transparently transmit it via Bluetooth to another connected Bluetooth module, no extra code is needed.
Adding Bluetooth to your project so it can be controlled by your phone is easy, just plugging in a slave module and connecting to it from your phone is all it takes, but getting 2 modules to communicate with each other is a bit trickier.
What you need to know
Bluetooth works by having a slave and a master. The slave modules can not initiate a connection to another Bluetooth device, but can accept connections, the master can be be set to either master or slave mode, when in master mode the module can initiate a connection to other devices. Be sure not to make the mistake of buying 2 slaves like I did! 2 masters or 1 master and 1 slave is what you need.
Sometimes eBay sellers don’t put much information about their module, to find out if its a slave or master check the following:
| Slave | Master | |
|---|---|---|
| Number of pins | 4 | 6 |
| Firmware | Linvor 1.5 or HC06 | HC05 |
The master modules (~£8) are usually a little bit more expensive than the slave modules (~£6).

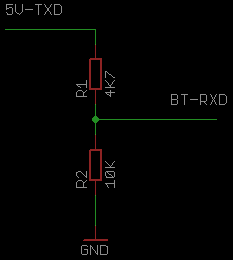
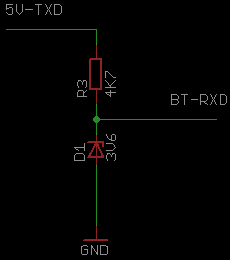
The modules contain 2 parts, the back plane and the main Bluetooth board. The main Bluetooth part of the module is designed for 3.3V, the back plane board has a 3.3V regulator built in so supplying 5V for power is fine, but there is no level conversion for the serial data, you probably don’t need to level convert the output (TXD) data since most 5V controllers see 3.3V as high, but the serial input (RXD) does need conversion, a voltage divider or resistor and zener diode will do the job.
Connecting
To configure the modules you will need a USB to serial converter, search for CP2102 on eBay or DealExtreme and you should be able to find them for less than £2, I’d recommend you get 2 so you can have both slave and master connected to your computer at the same time, make sure at least one of the converters has a 3.3V out as well as 5V out.
Connect the serial converter and Bluetooth modules like so:
| Module | Converter |
|---|---|
| VCC | 5V |
| GND | GND |
| TXD | RXD |
| RXD | TXD |
The serial converters usually use 3.3V signaling for serial, so no level conversion needed.
You will need a serial console program, I use RealTerm.
Configuring
Slave
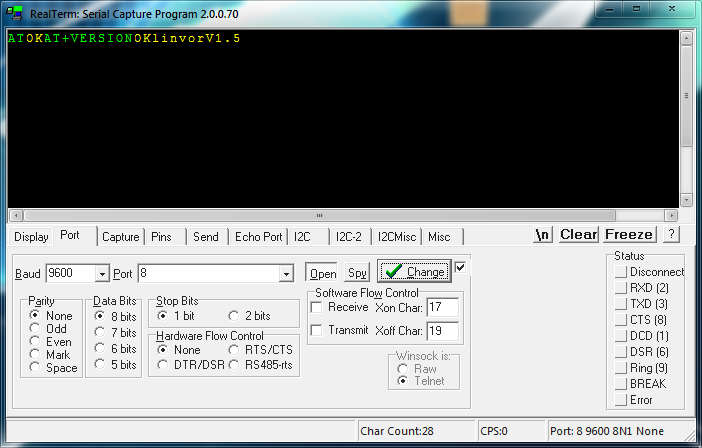
The slave module can be configured whenever no other BT devices are connected to it, the default baud rate is 9600, no parity, 8 data bits, 1 stop bit. Once you’ve opened the COM port in your serial console, type AT, the module should reply back with OK.
The timing of sending characters is important, if you type too slow the module won’t recognise the command, it will see it as 2 separate commands A and T, its probably best to copy & paste.
To check the firmware copy & paste AT+VERSION and it should respond with OKLinvor1.5.
Set PIN: AT+PIN1234
There are only a few available commands for slave modules –
| Command | Info |
|---|---|
| AT+BAUD<setting> | Set baud rate 1 – 1200 2 – 2400 3 – 4800 4 – 9600 5 – 19200 6 – 38400 7 – 57600 8 – 115200 9 – 230400 A – 460800 B – 921600 C – 1382400 |
| AT+NAME<name> | Name – Max 20 characters |
| AT+PIN<number> | PIN – 4 digit number |
Master (and master as a slave)
Configuring the master is a little different from the slave, there are 2 ways to put the module into AT mode:
Method 1
- Turn off module
- Connect the key pin on the module to 3.3V on the serial converter
- Turn on module
The baud rate will always be 38400 with this method, the module must also be power cycled to get back into normal mode.
Method 2
- Turn on module
- Connect the key pin on the module to 3.3V on the serial converter
The baud rate will be whatever it’s configured to, default 9600, the module can be put in and out of AT mode without being power cycled.
Quick Check
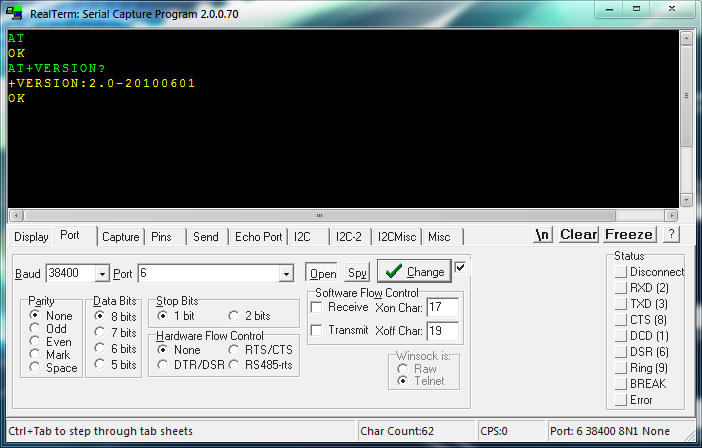
The timing of commands doesn’t matter with the master modules, instead you need to end each command by pressing the enter key (\r\n), sometimes the response will be continually repeated, pressing enter again will stop it.
Entering AT should return OK, entering AT+VERSION? should return something similar to +VERSION:2.0-20100601
Master as a slave
If you’ve got 2 masters you will need to have one operating as a slave which isn’t too hard to do:
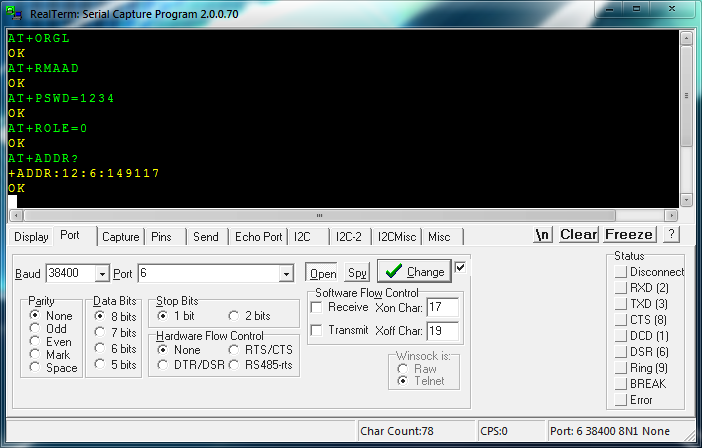
Reset to defaults:
AT+ORGL
Clear any paired devices:
AT+RMAAD
Set PIN:
AT+PSWD=1234
Slave mode:
AT+ROLE=0
Get the address of the device:
AT+ADDR?
Now that you have the address you can skip the AT+INQ and AT+RNAME? parts for configuring the master.
Turn off the module, disconnect key from 3.3V and turn back on.
Master as a master
Now, to get the master to connect to the slave module you will need to find the address of the slave. Make sure the slave module is powered up and enter these commands into the master module:
Reset to defaults:
AT+ORGL
Clear any paired devices:
AT+RMAAD
Master mode:
AT+ROLE=1
Need to restart after changing role:
AT+RESET
Allow connecting to any address:
AT+CMODE=1
Inquire mode – Standard, stop after 5 devices found, (or) stop searching after 5 seconds:
AT+INQM=0,5,5
Set PIN, should be the same as the slave:
AT+PSWD=1234
Start SPP profile lib (needed to do any Bluetooth transmitting/receiving):
AT+INIT
Note: If it says Error:(17) then that means it’s already loaded, you can carry on.
Start searching:
AT+INQ
A short list of devices found should appear, one of them will be the slave module.
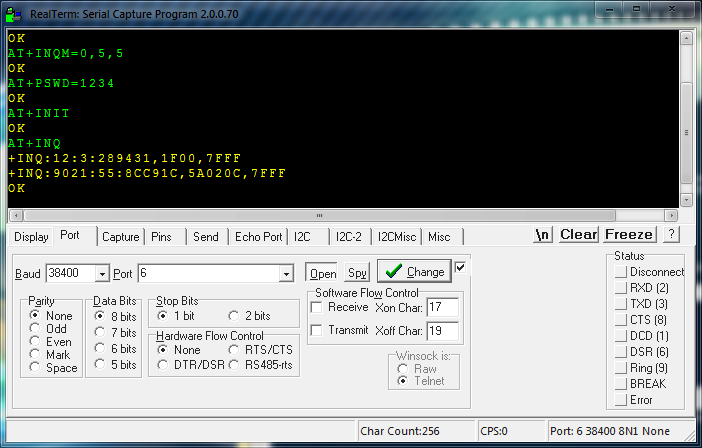
The format of the output is as follows:
+INQ:address,type,signal
Type can be ignored. The signal will be 7FFF since inquire is in standard mode, in RSSI mode you’ll get a load of the same device but with different signal levels which you don’t want at the moment.
Copy the address part of the devices found, for example 12:3:289431 and change the colons to commas – 12,3,289431.
To find out which device is the slave module you will need to query each address for its name:
AT+RNAME? <address>
Replace <address> with address of device like 12,3,289431
Response should be +RNAME:linvor if you’re using a normal slave module or +RNAME:HC05 if you’re using a master module as a slave.
Now you’ve got the address of the slave module you need to pair with it:
AT+PAIR=<address>,<timeout>
Note: If you are going to make the master connect to your phone then you need to set the timeout long enough for you to type in the PIN.
Bind address:
AT+BIND=<address>
Only allow connecting to the bound address:
AT+CMODE=0
And now to actually connect:
AT+LINK=<address>
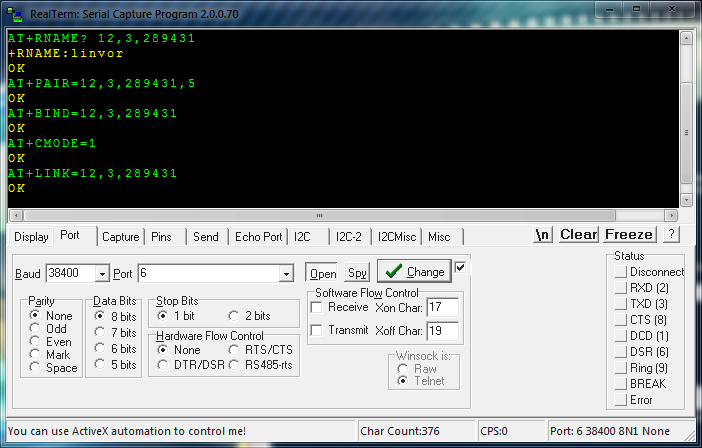
If successful the slave LED should be on solid and the master LED should have a heartbeat flash pattern.
The modules have now been configured! They should automatically connect to each other whenever possible.
A full list of commands for master modules can be found in the download below.
Sending data
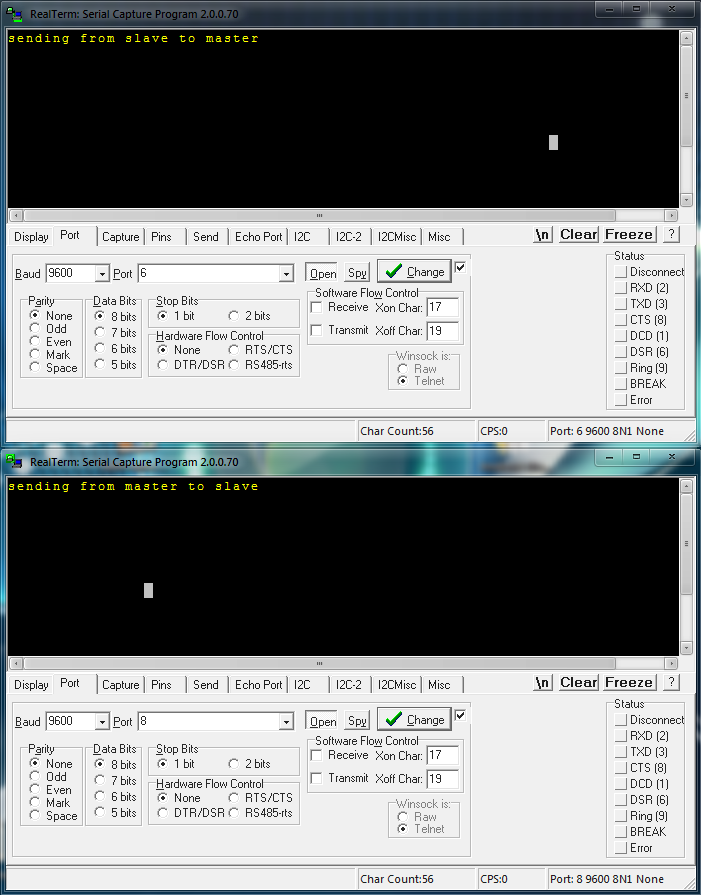
Now, if you entered AT mode on the master module by connecting key to 3.3V before turning on the module, you will need to turn off the module, disconnect key and turn it back on.
If you connected key while the module was on then all you need to do is disconnect key.
If you open up 2 serial consoles and have one open the COM port to the slave and the other open the COM port to the master you should be able to type in one and it will appear in the other console, if that worked you just need to plug them in to your projects!
Extra stuff
The Bluetooth board of these modules also have connections for SPI, USB and PCM audio, no idea if they work or not.
It also seems to be possible to upgrade the firmware on the modules too, making it possible to put master firmware onto a slave module – https://byron76.blogspot.co.uk/2011/09/i-hope-you-have-good-time-soldering.html
More info about various Bluetooth modules – https://wiki.pinguino.cc/index.php/SPP_Bluetooth_Modules (website is now defunct - [Web archive])


Comments