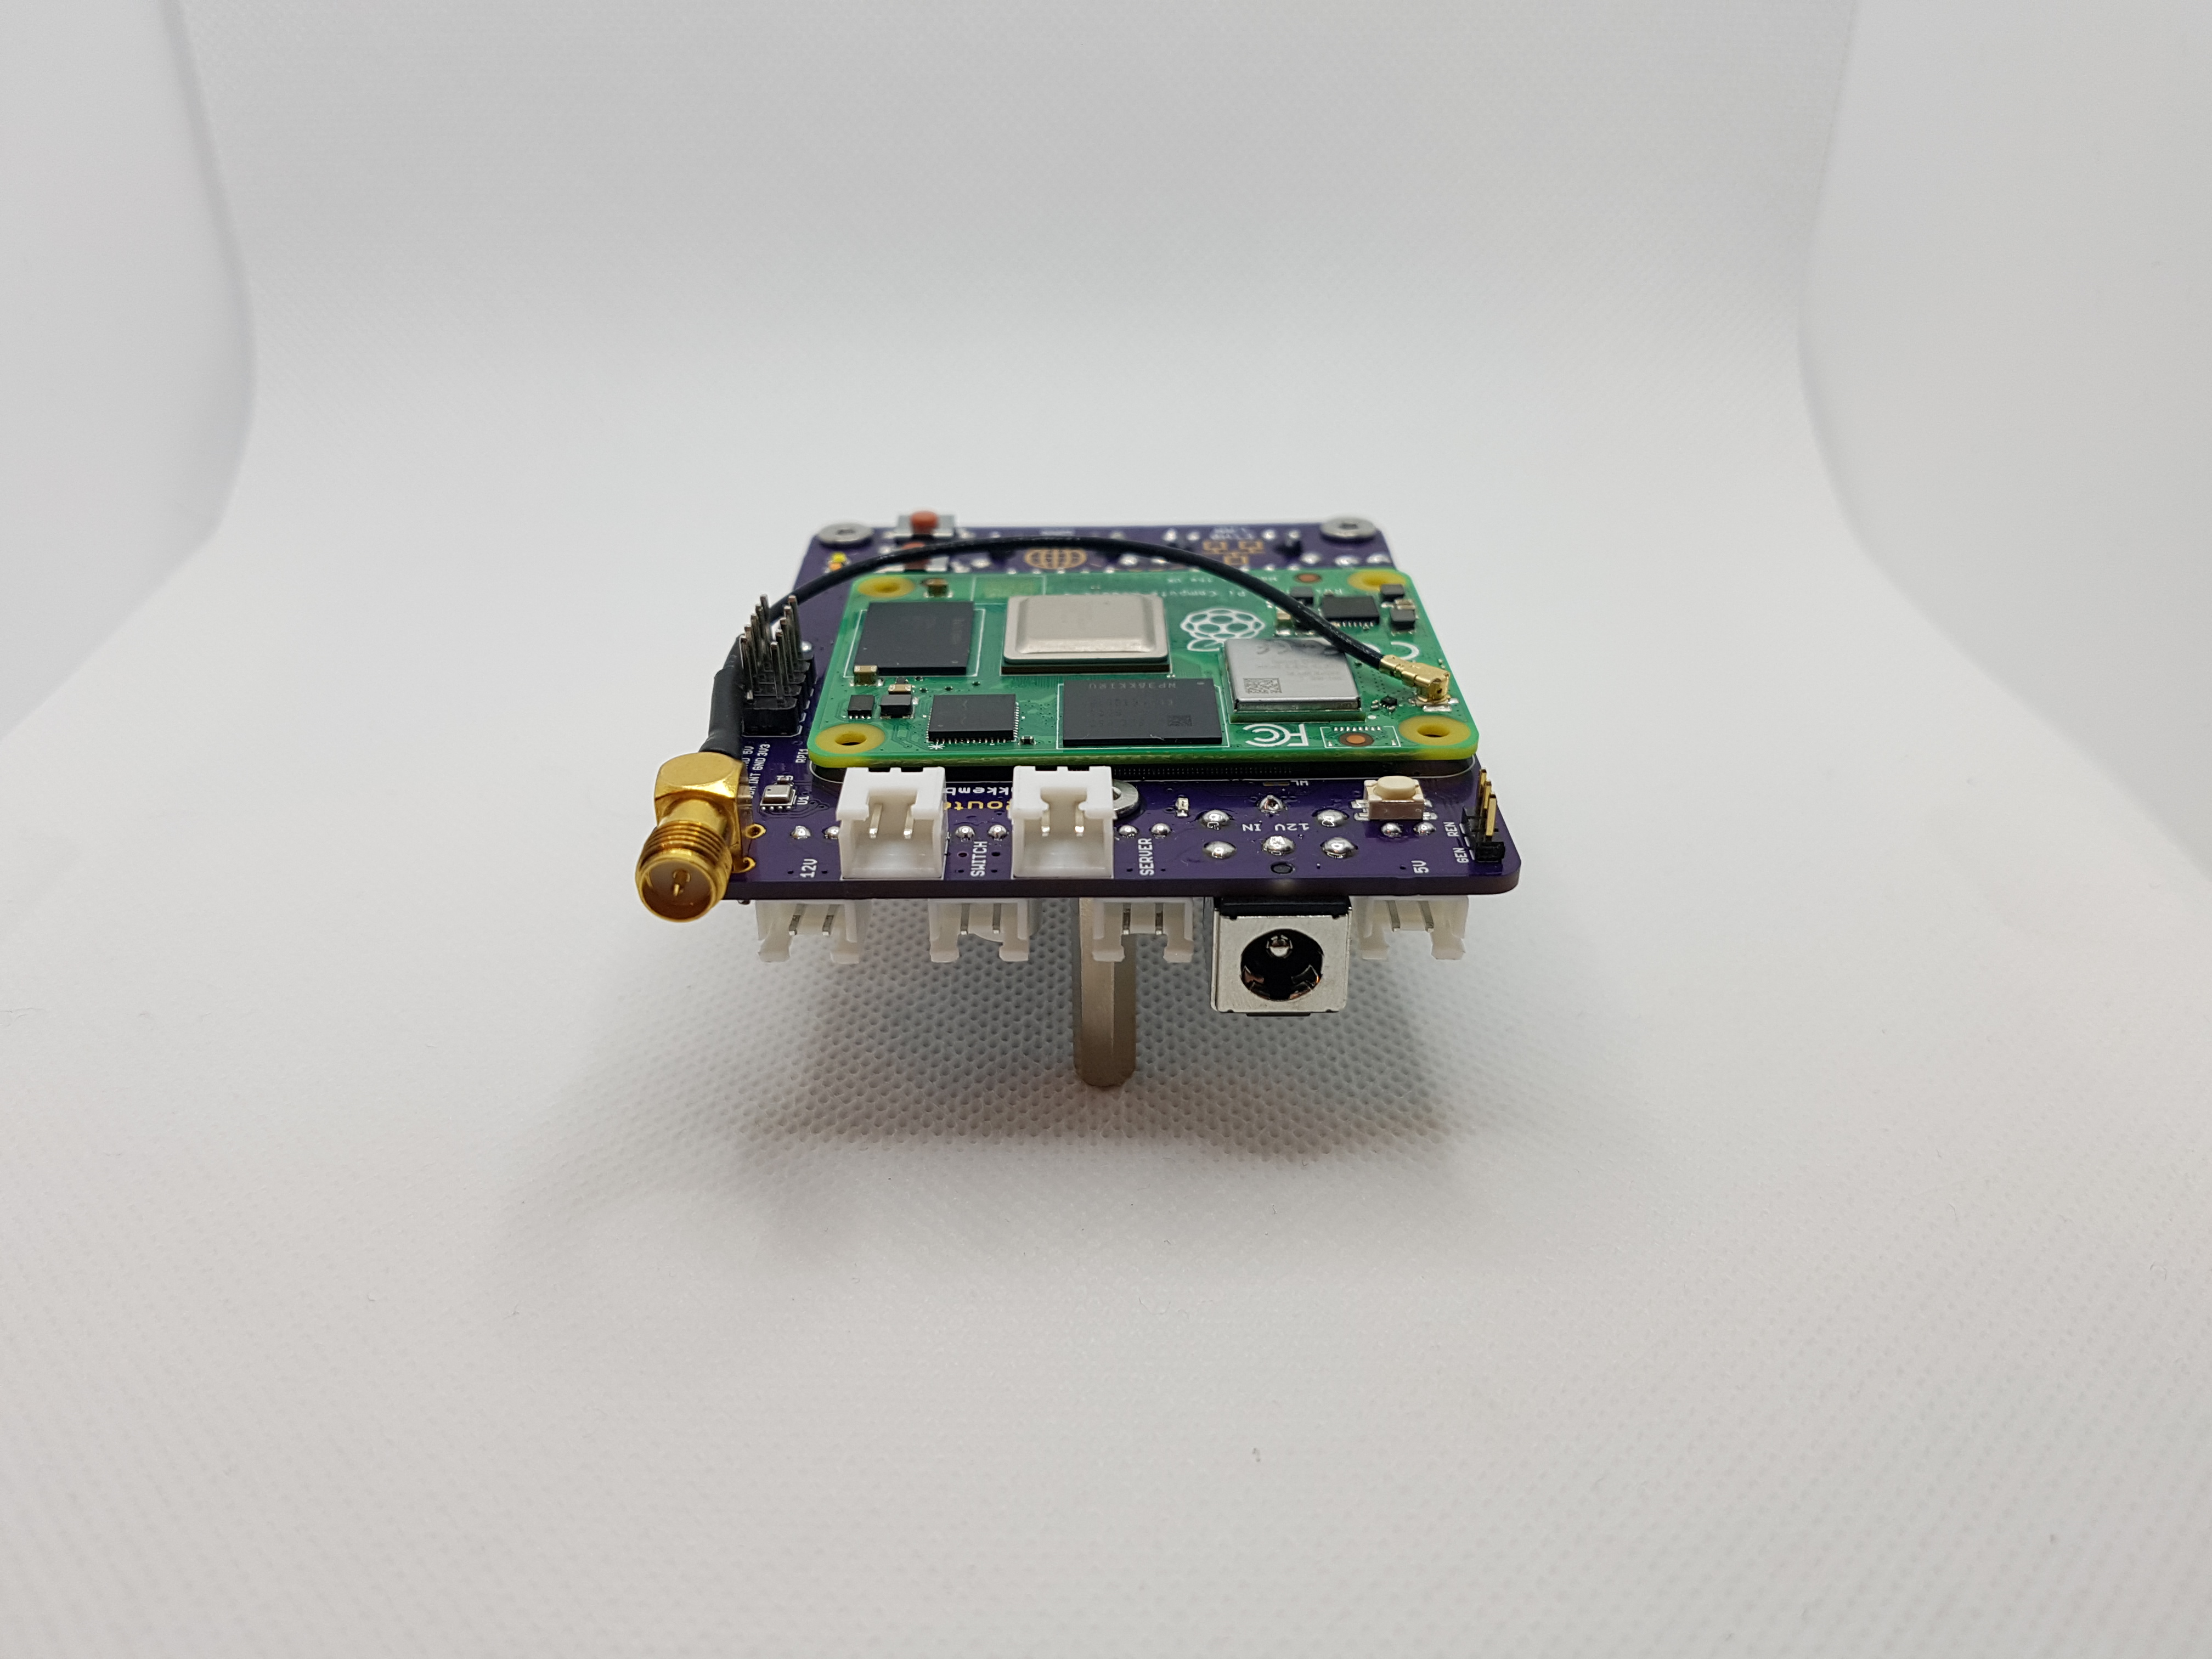
RouterPi - A Compute Module 4 Router
Another Raspberry Pi router! I've been wanting to use a Raspberry Pi as my home internet router for a long time, but previous versions were not quite up to scratch. I needed two ethernet interfaces that could handle 1Gb traffic with low latency. The Pi 2 had 100Mb Ethernet and the Pi 3 had 1Gb ethernet, but it was shared over a USB 2.0 bus thus limiting it to a few hundred Mbps. There were other Pi-like derivatives, but their software and long-term support didn't look great. So, for the better part of a decade, I've been using a small fan-less Intel N3050 mini-ITX system with a Gigabyte N3050N-D3H motherboard that had dual onboard Ethernet running Debian Linux from a USB stick.
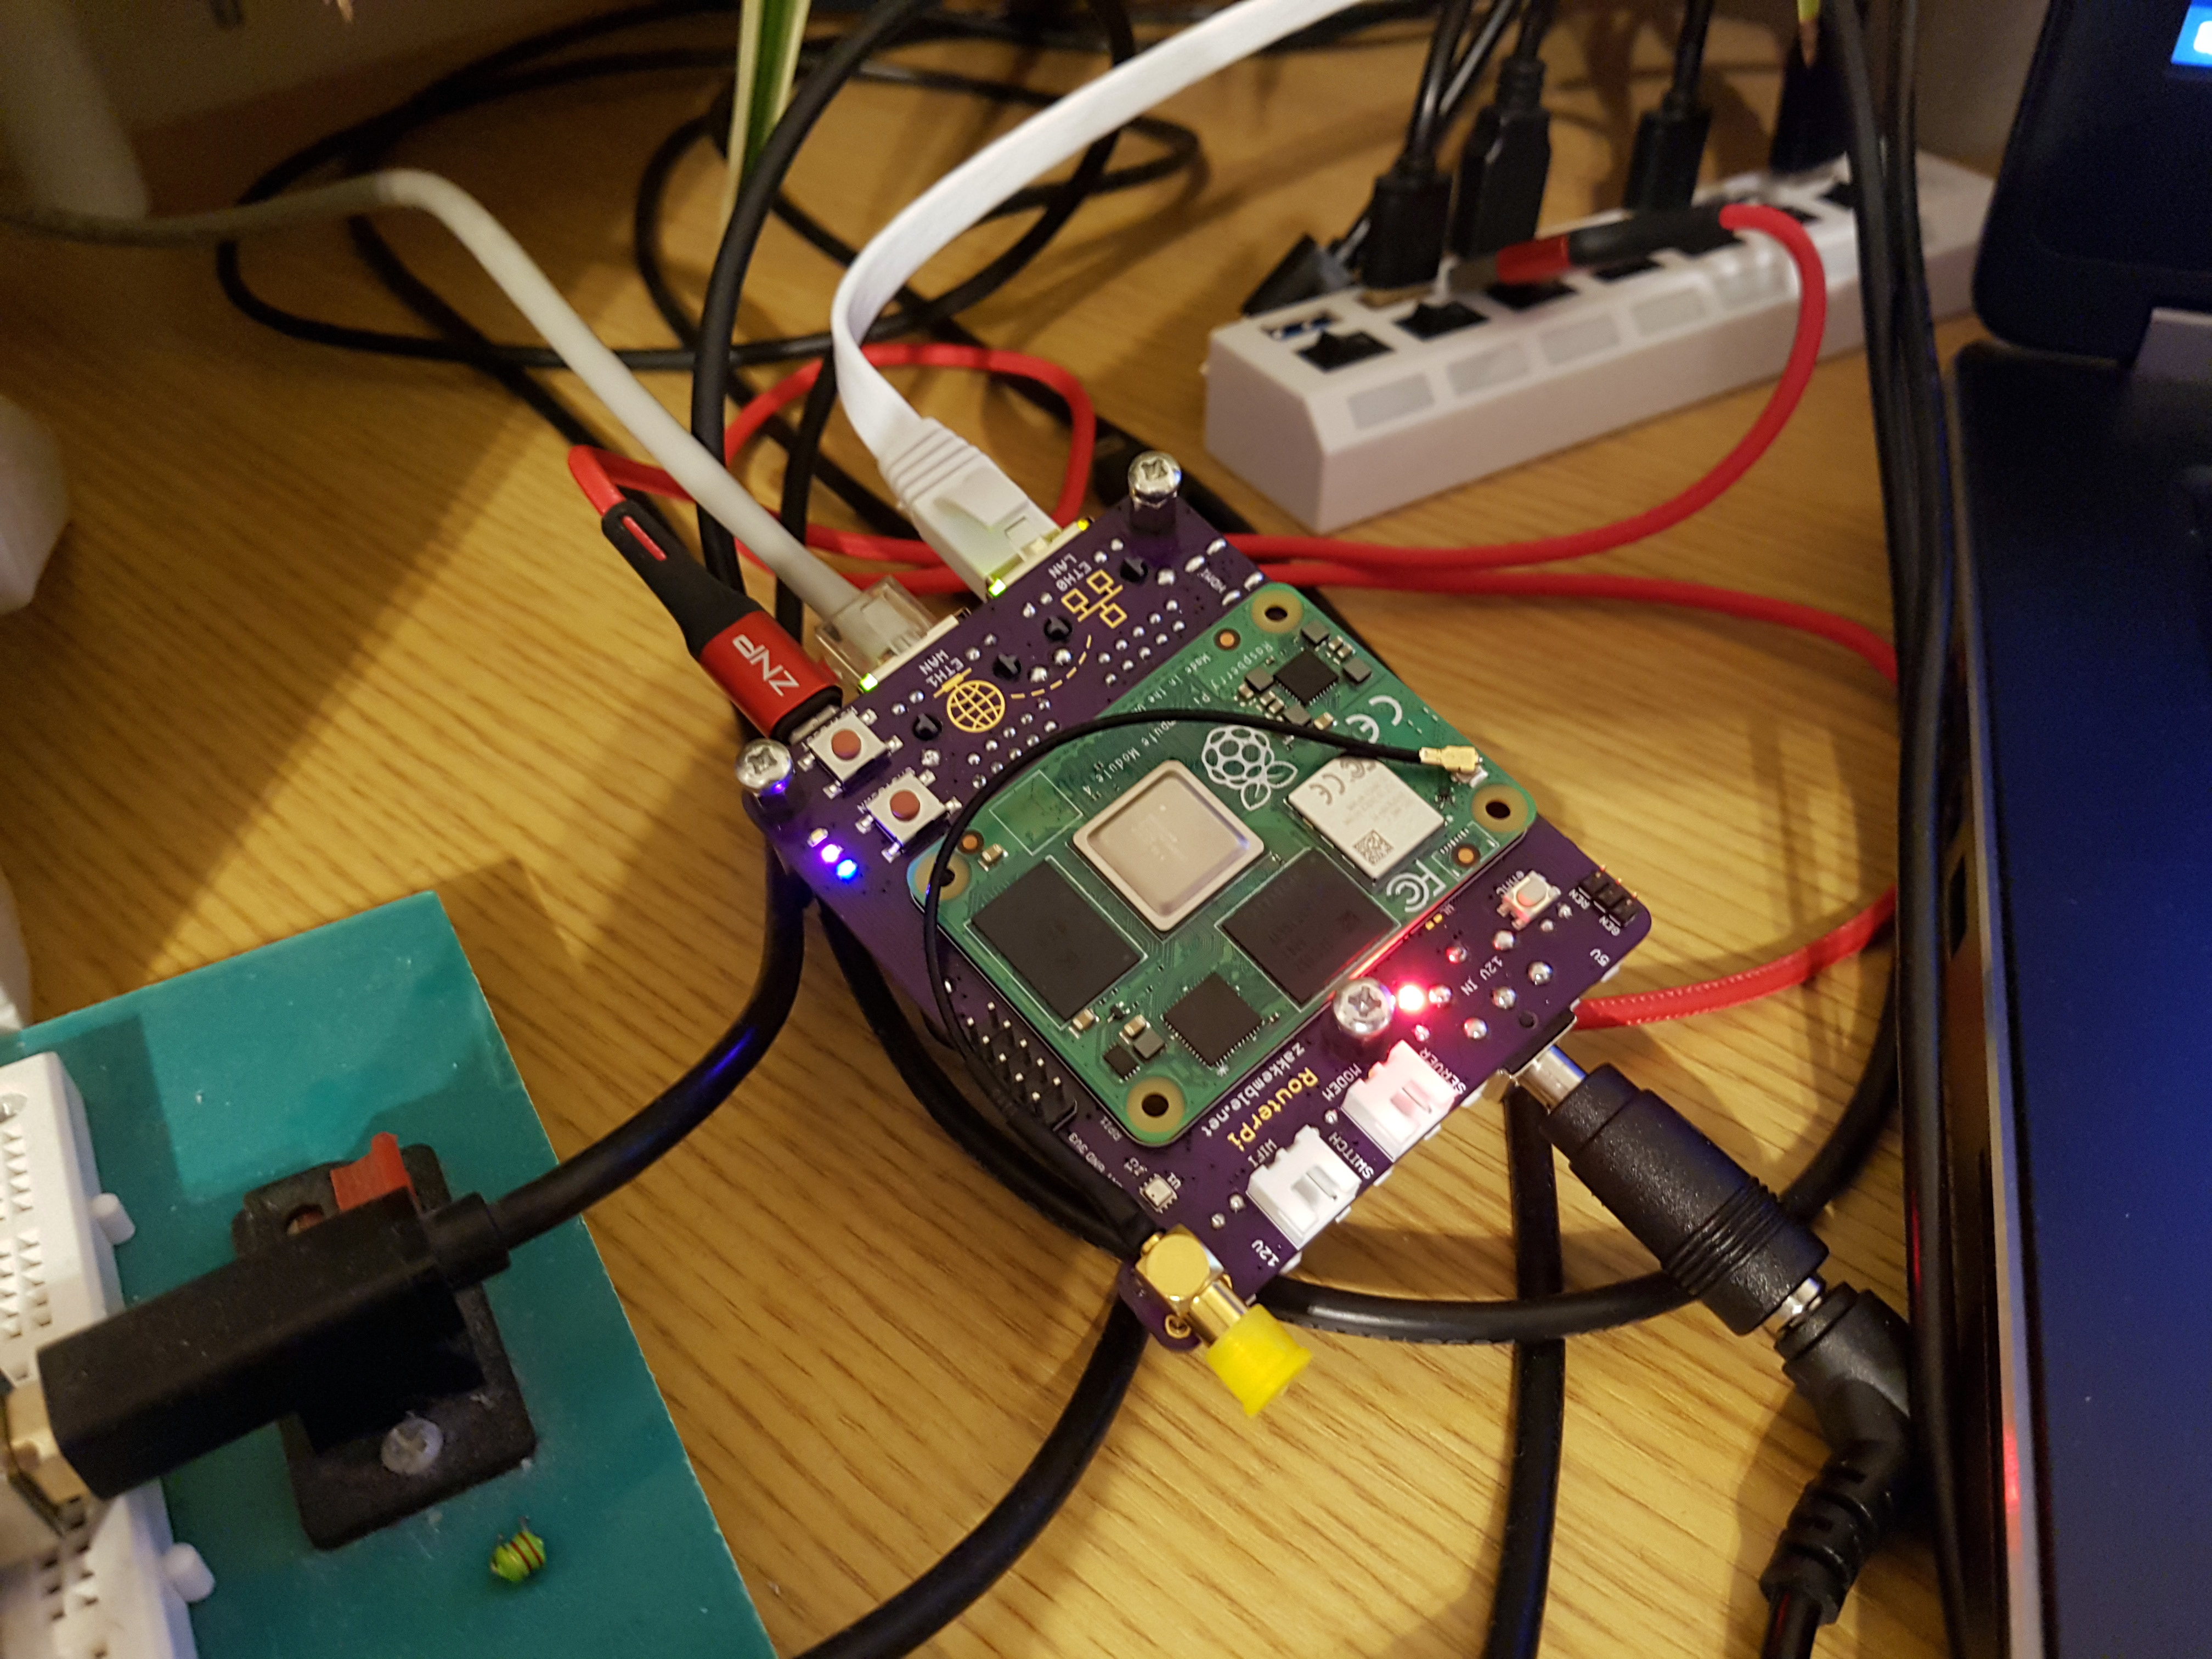
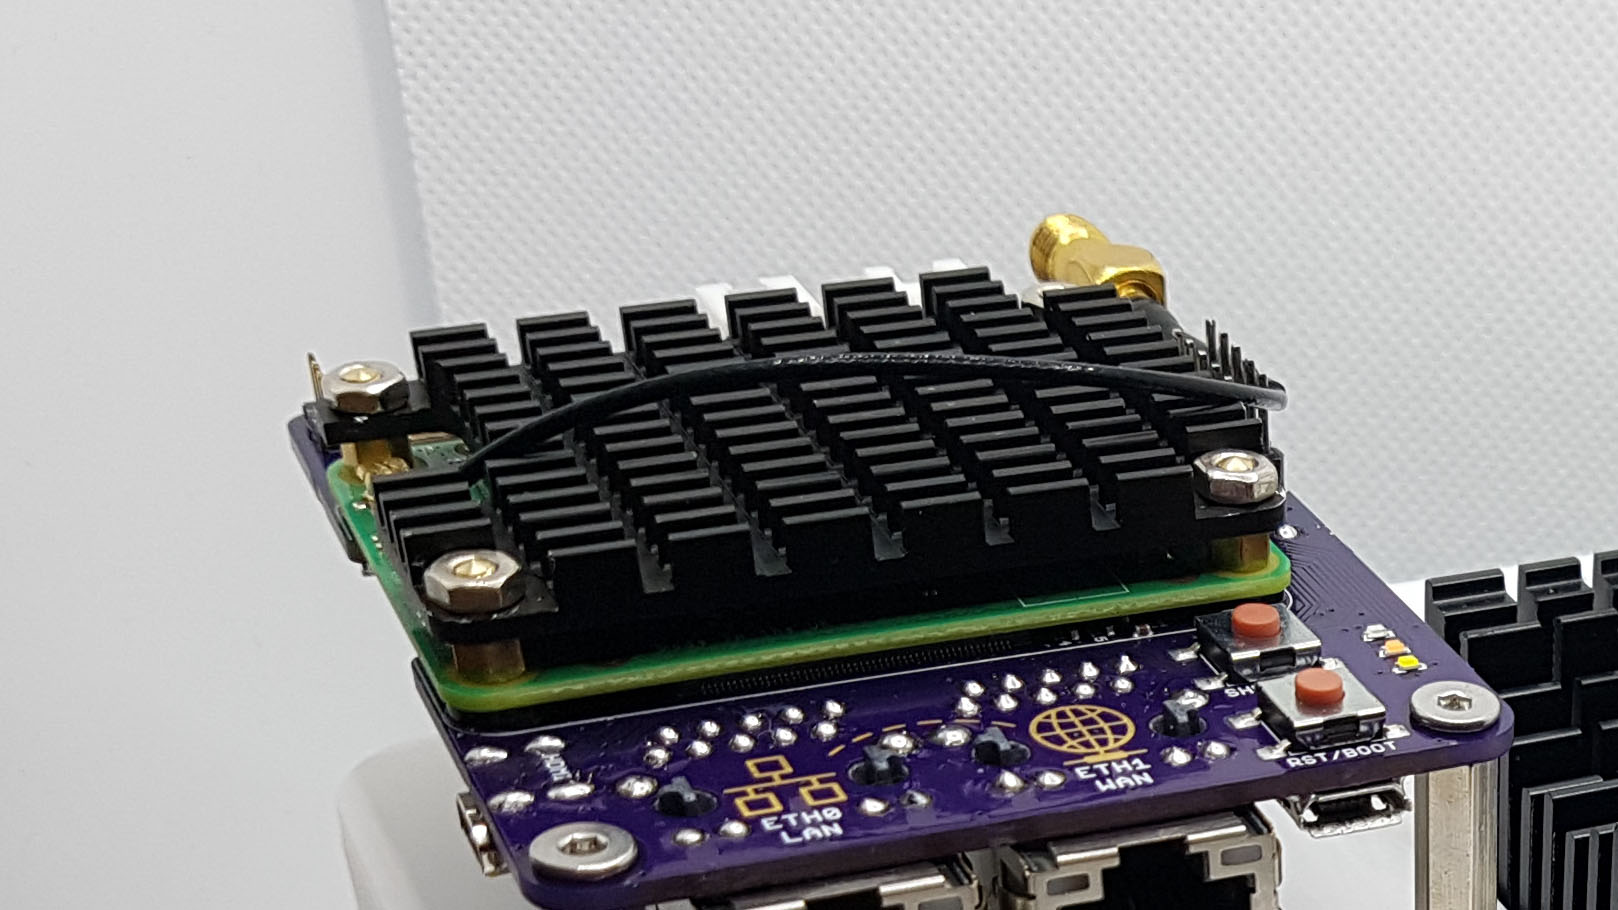
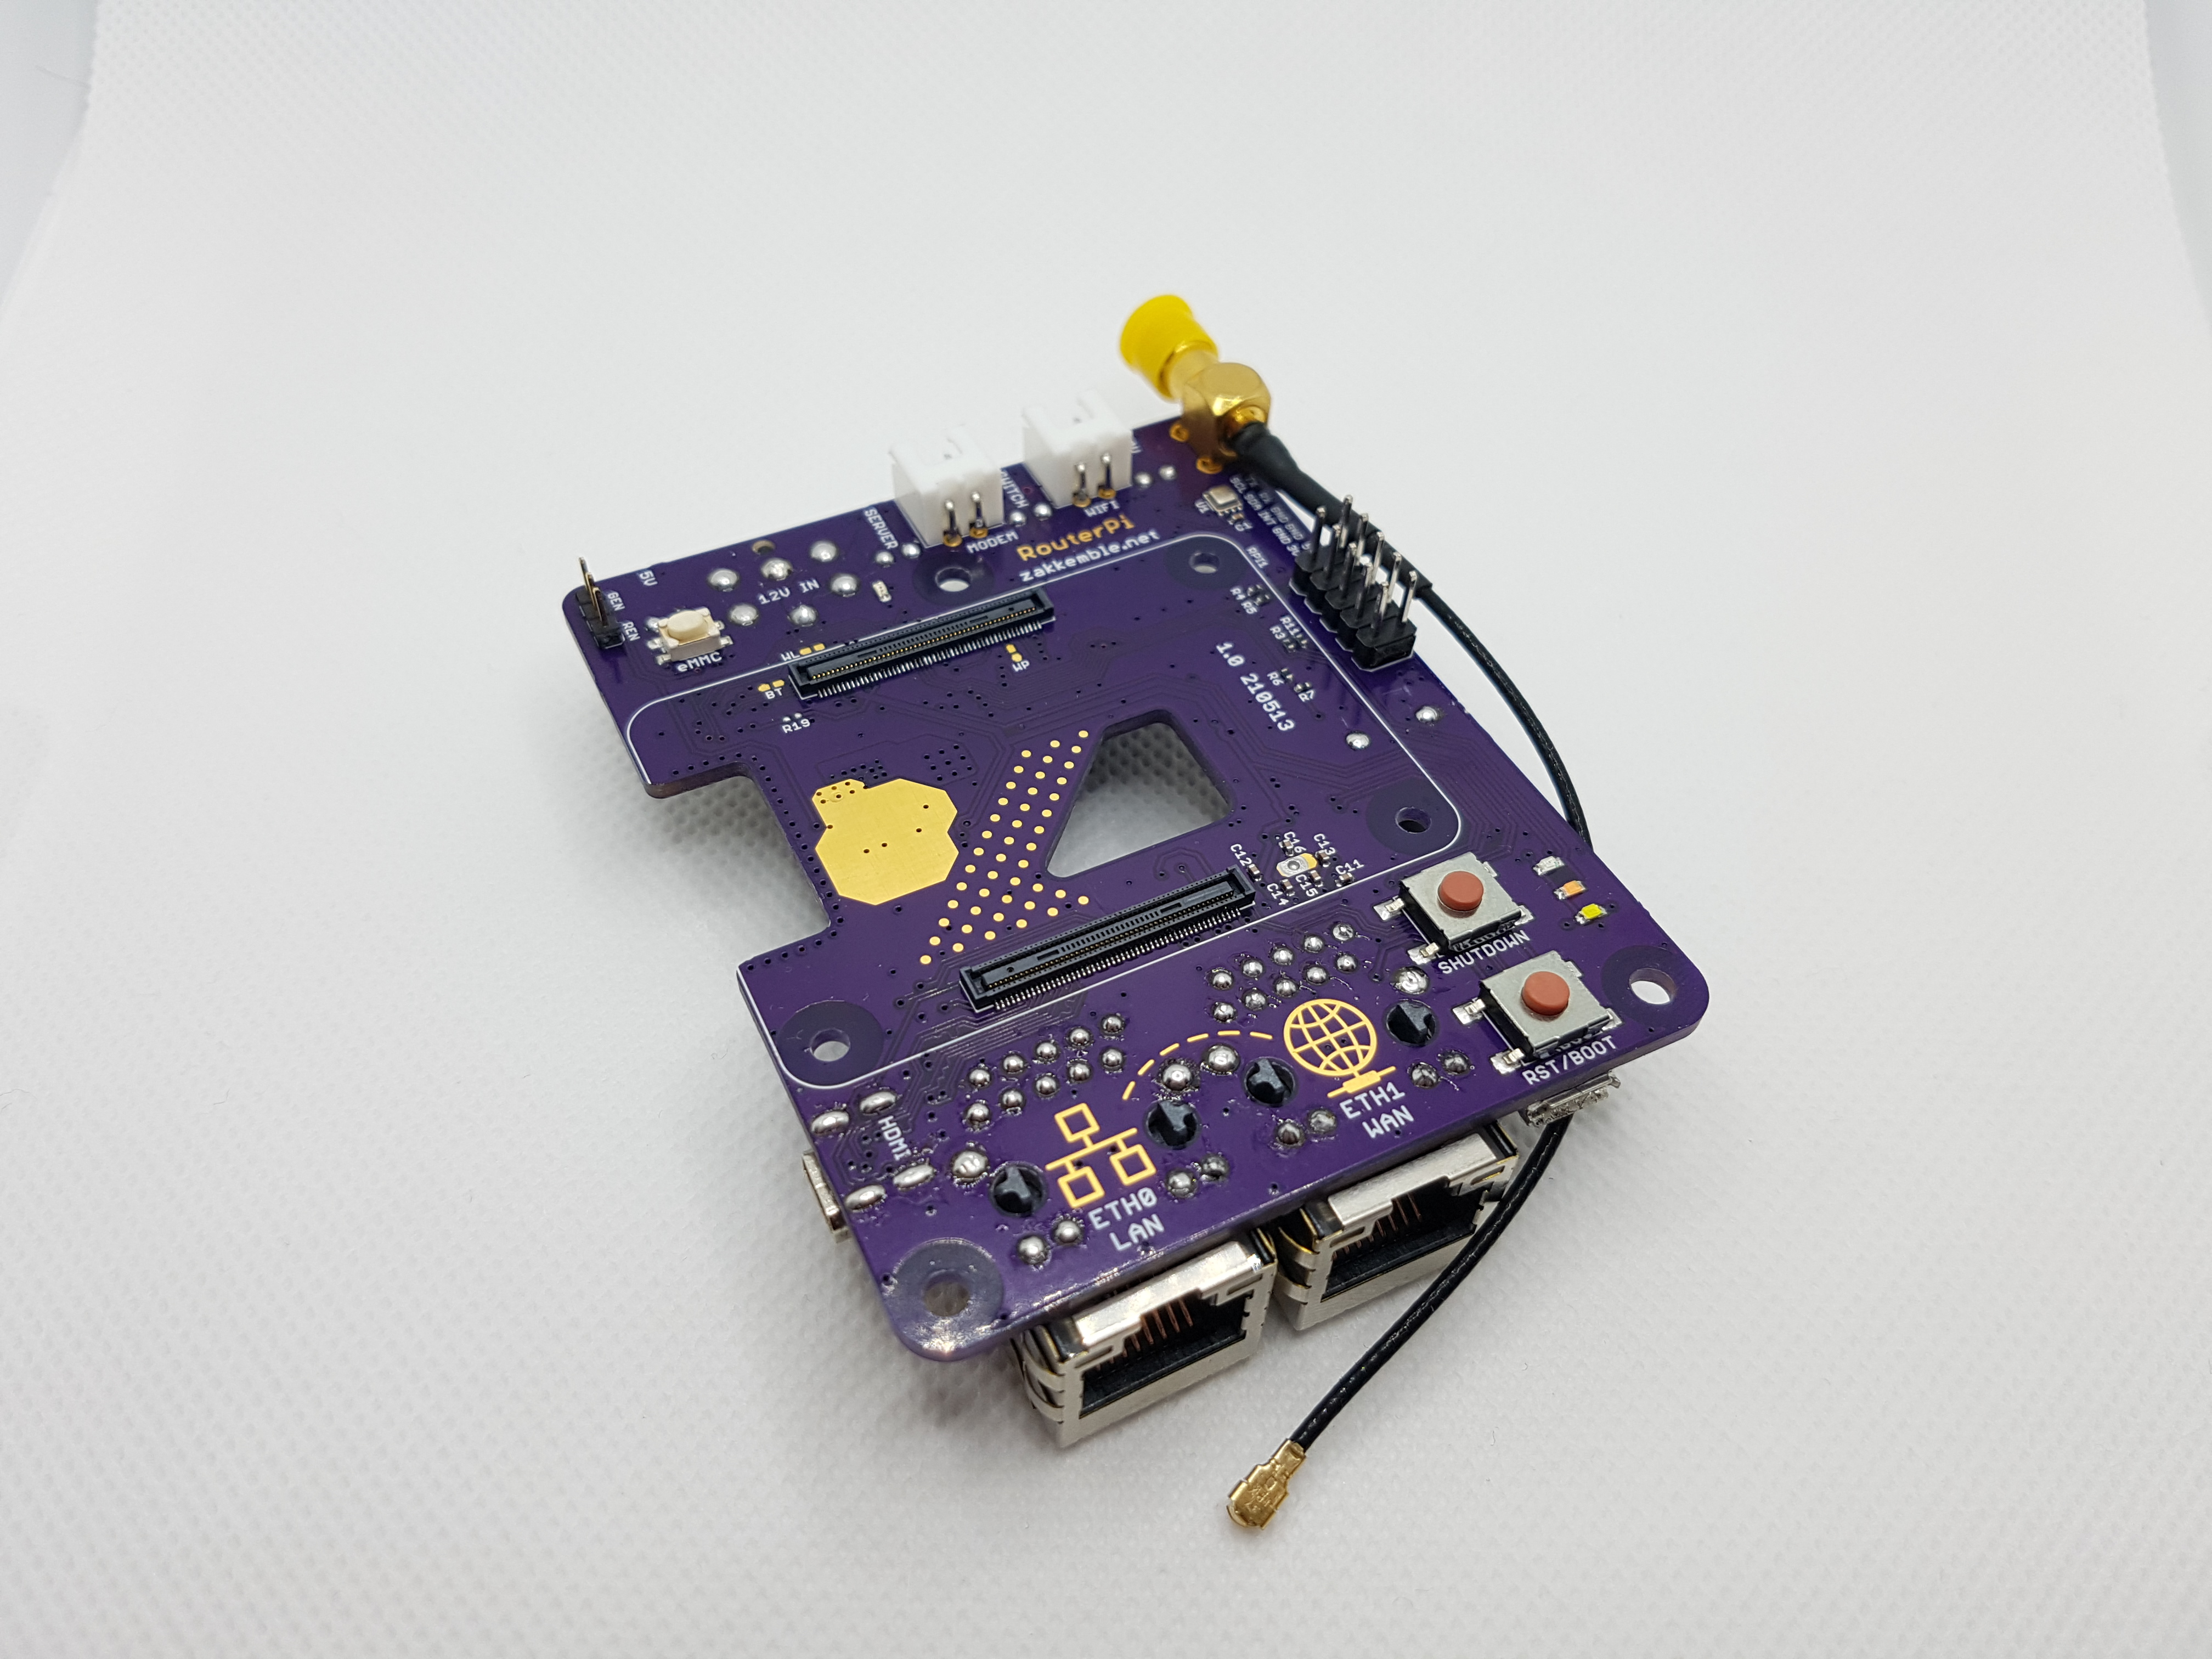
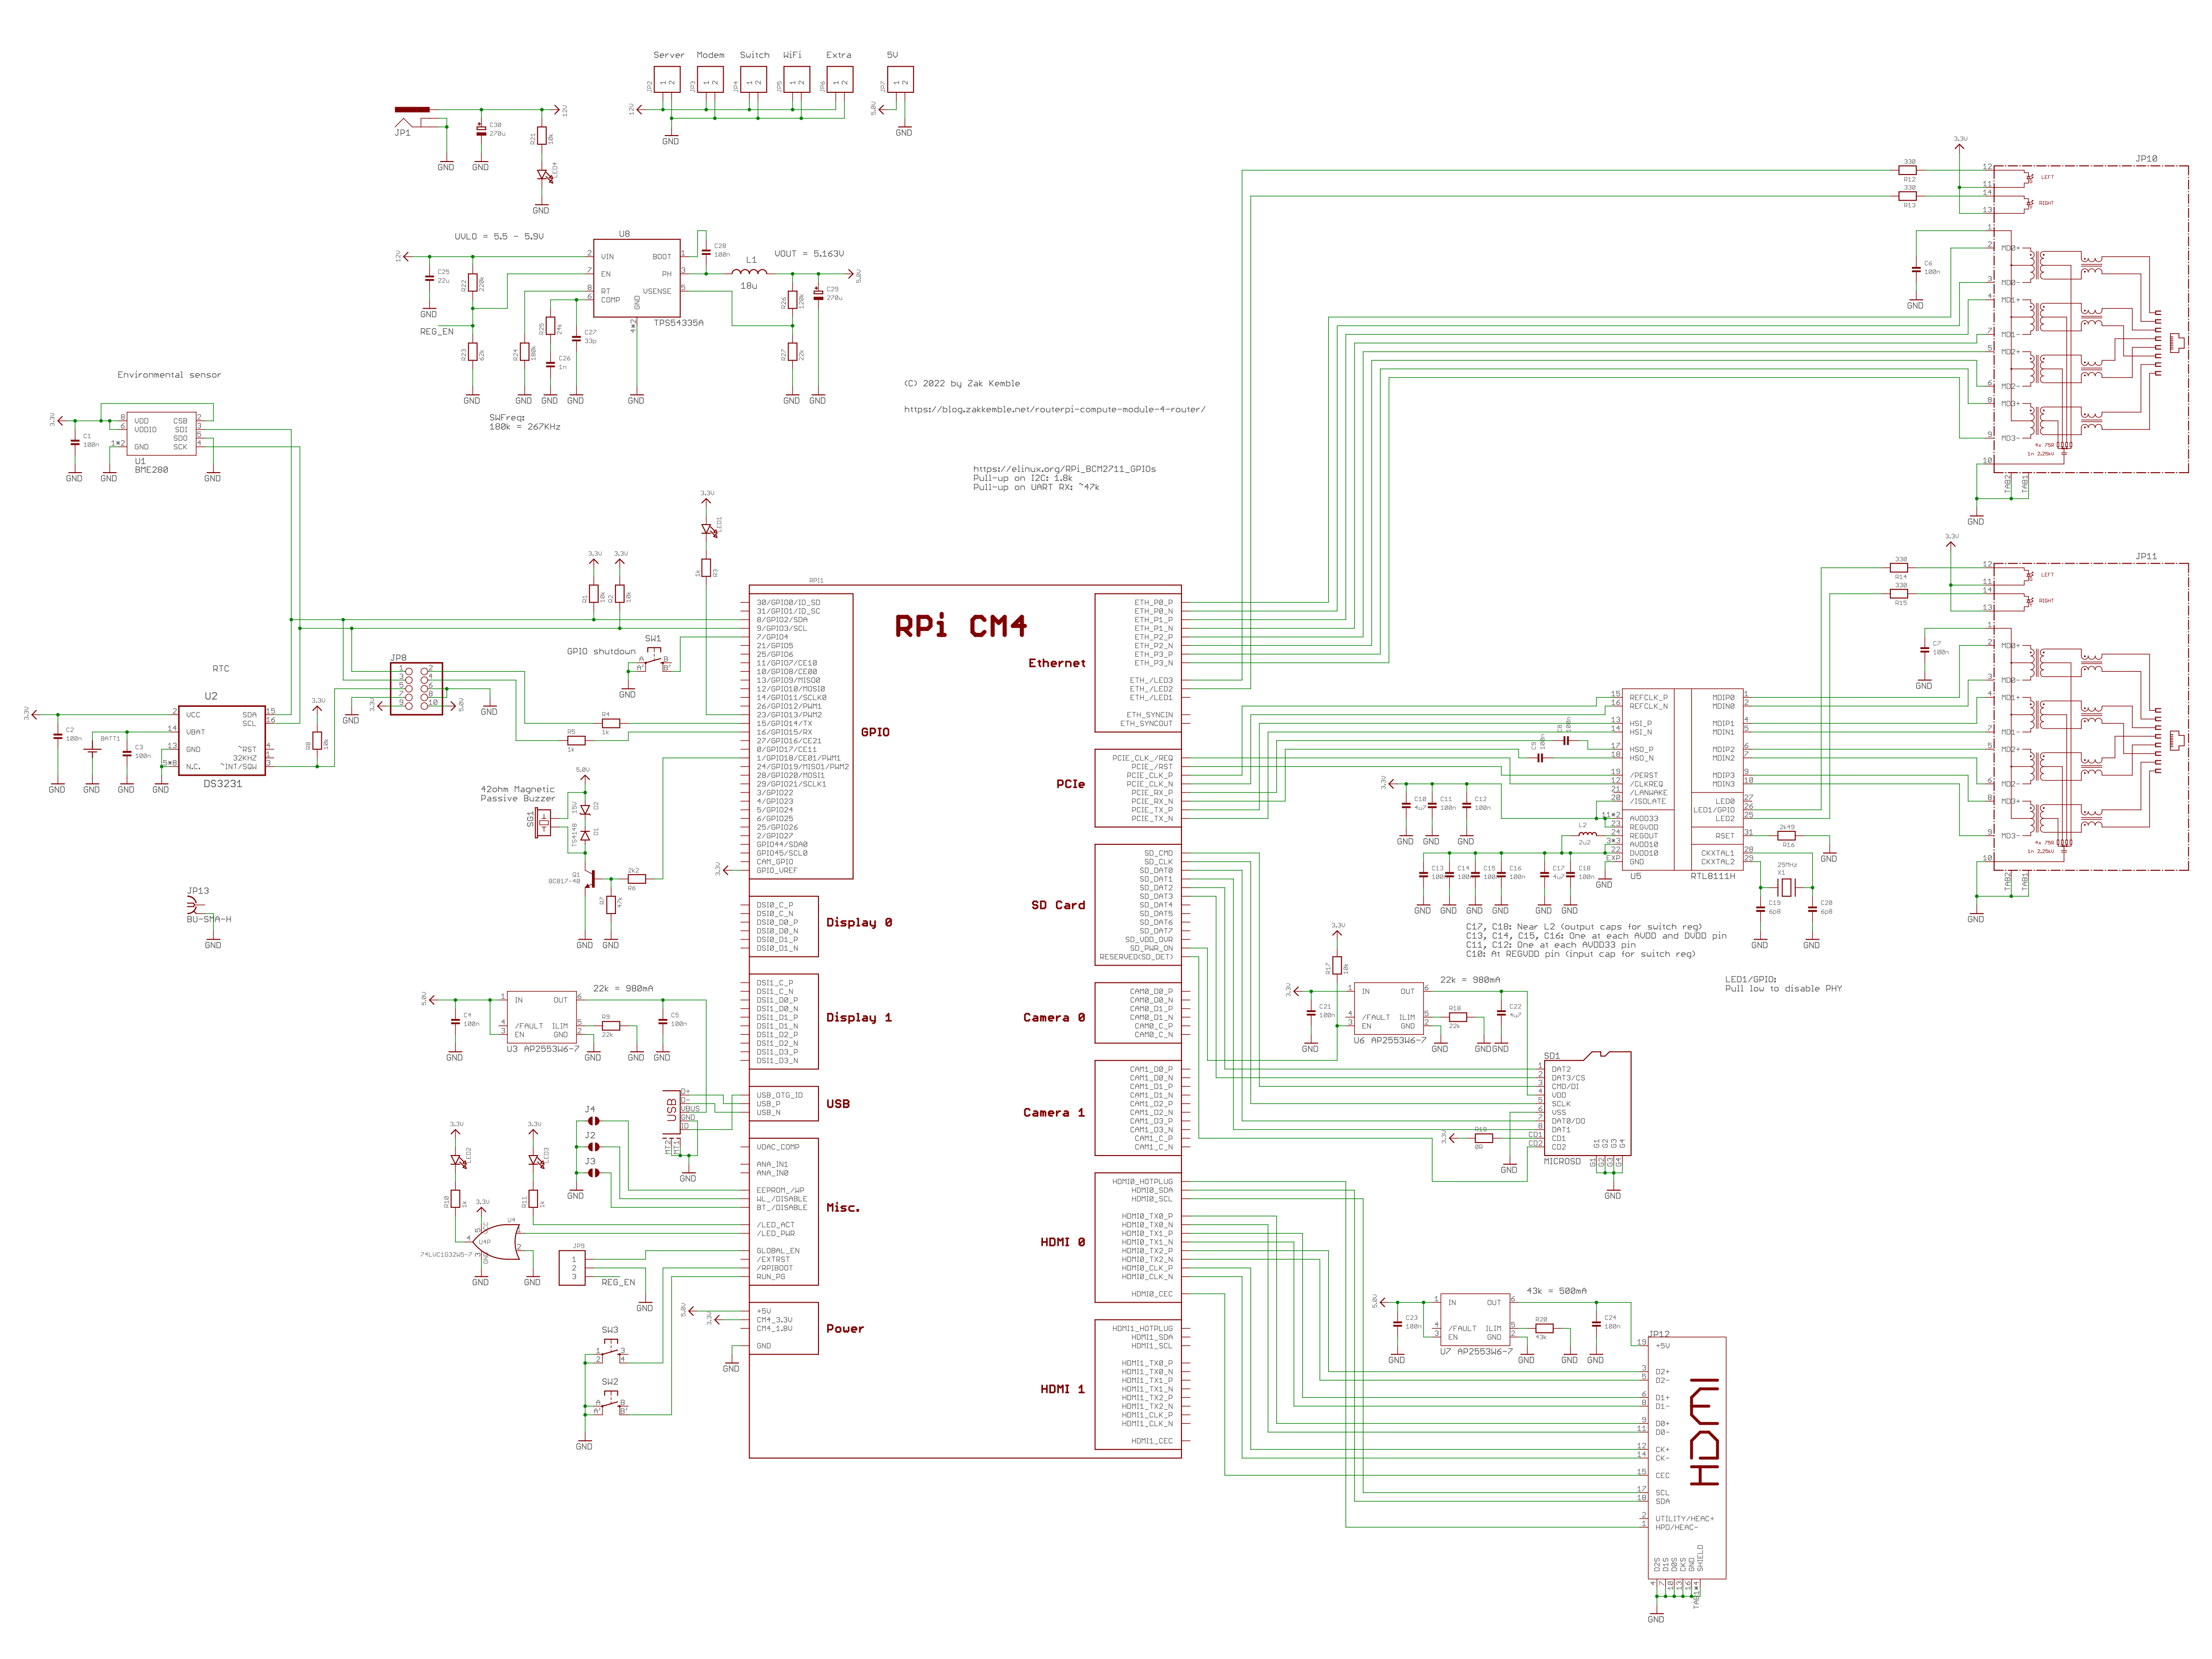
Then came the Pi 4 with 1Gb Ethernet on its own bus and USB 3.0! However, I still wasn't happy with the increased CPU overhead and power consumption of having to have the second Ethernet interface connected to the USB 3.0 hub. This was the main driving reason that I made the PCIe bridge "chip", so that I could add a PCIe network card. But then a few months later the Compute Module 4 was launched, and now the RouterPi carrier board:
Hardware
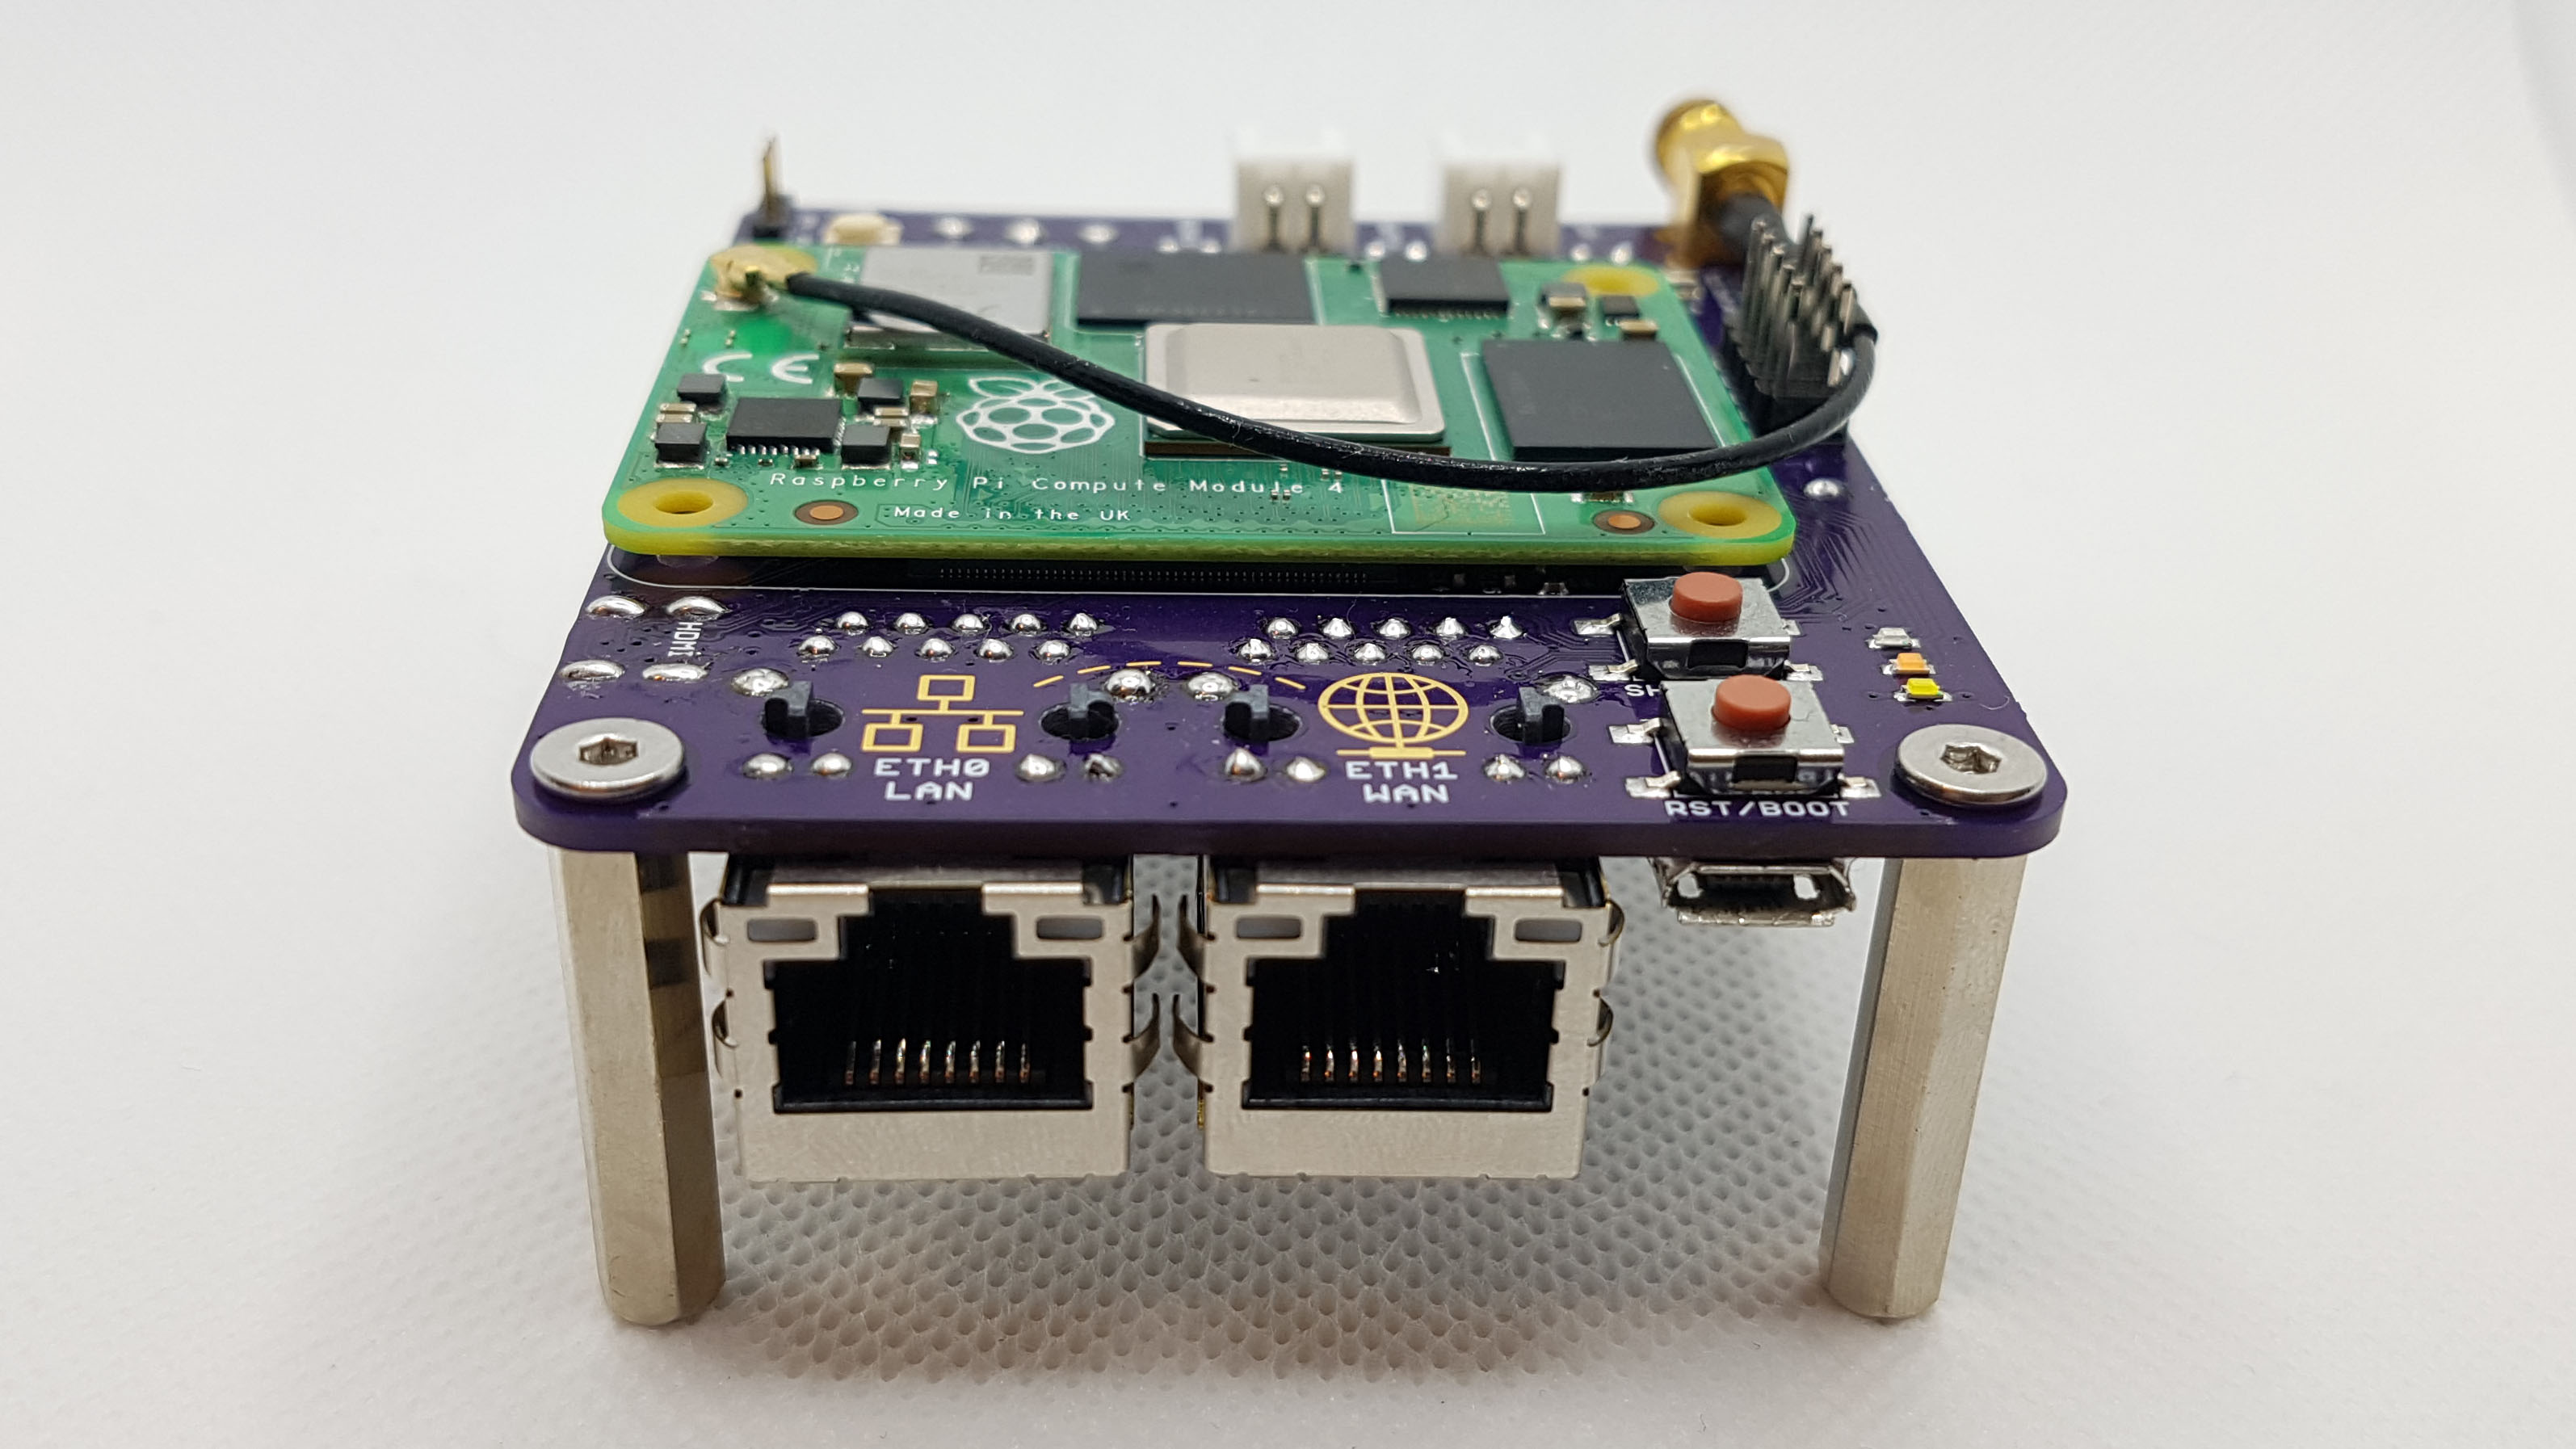
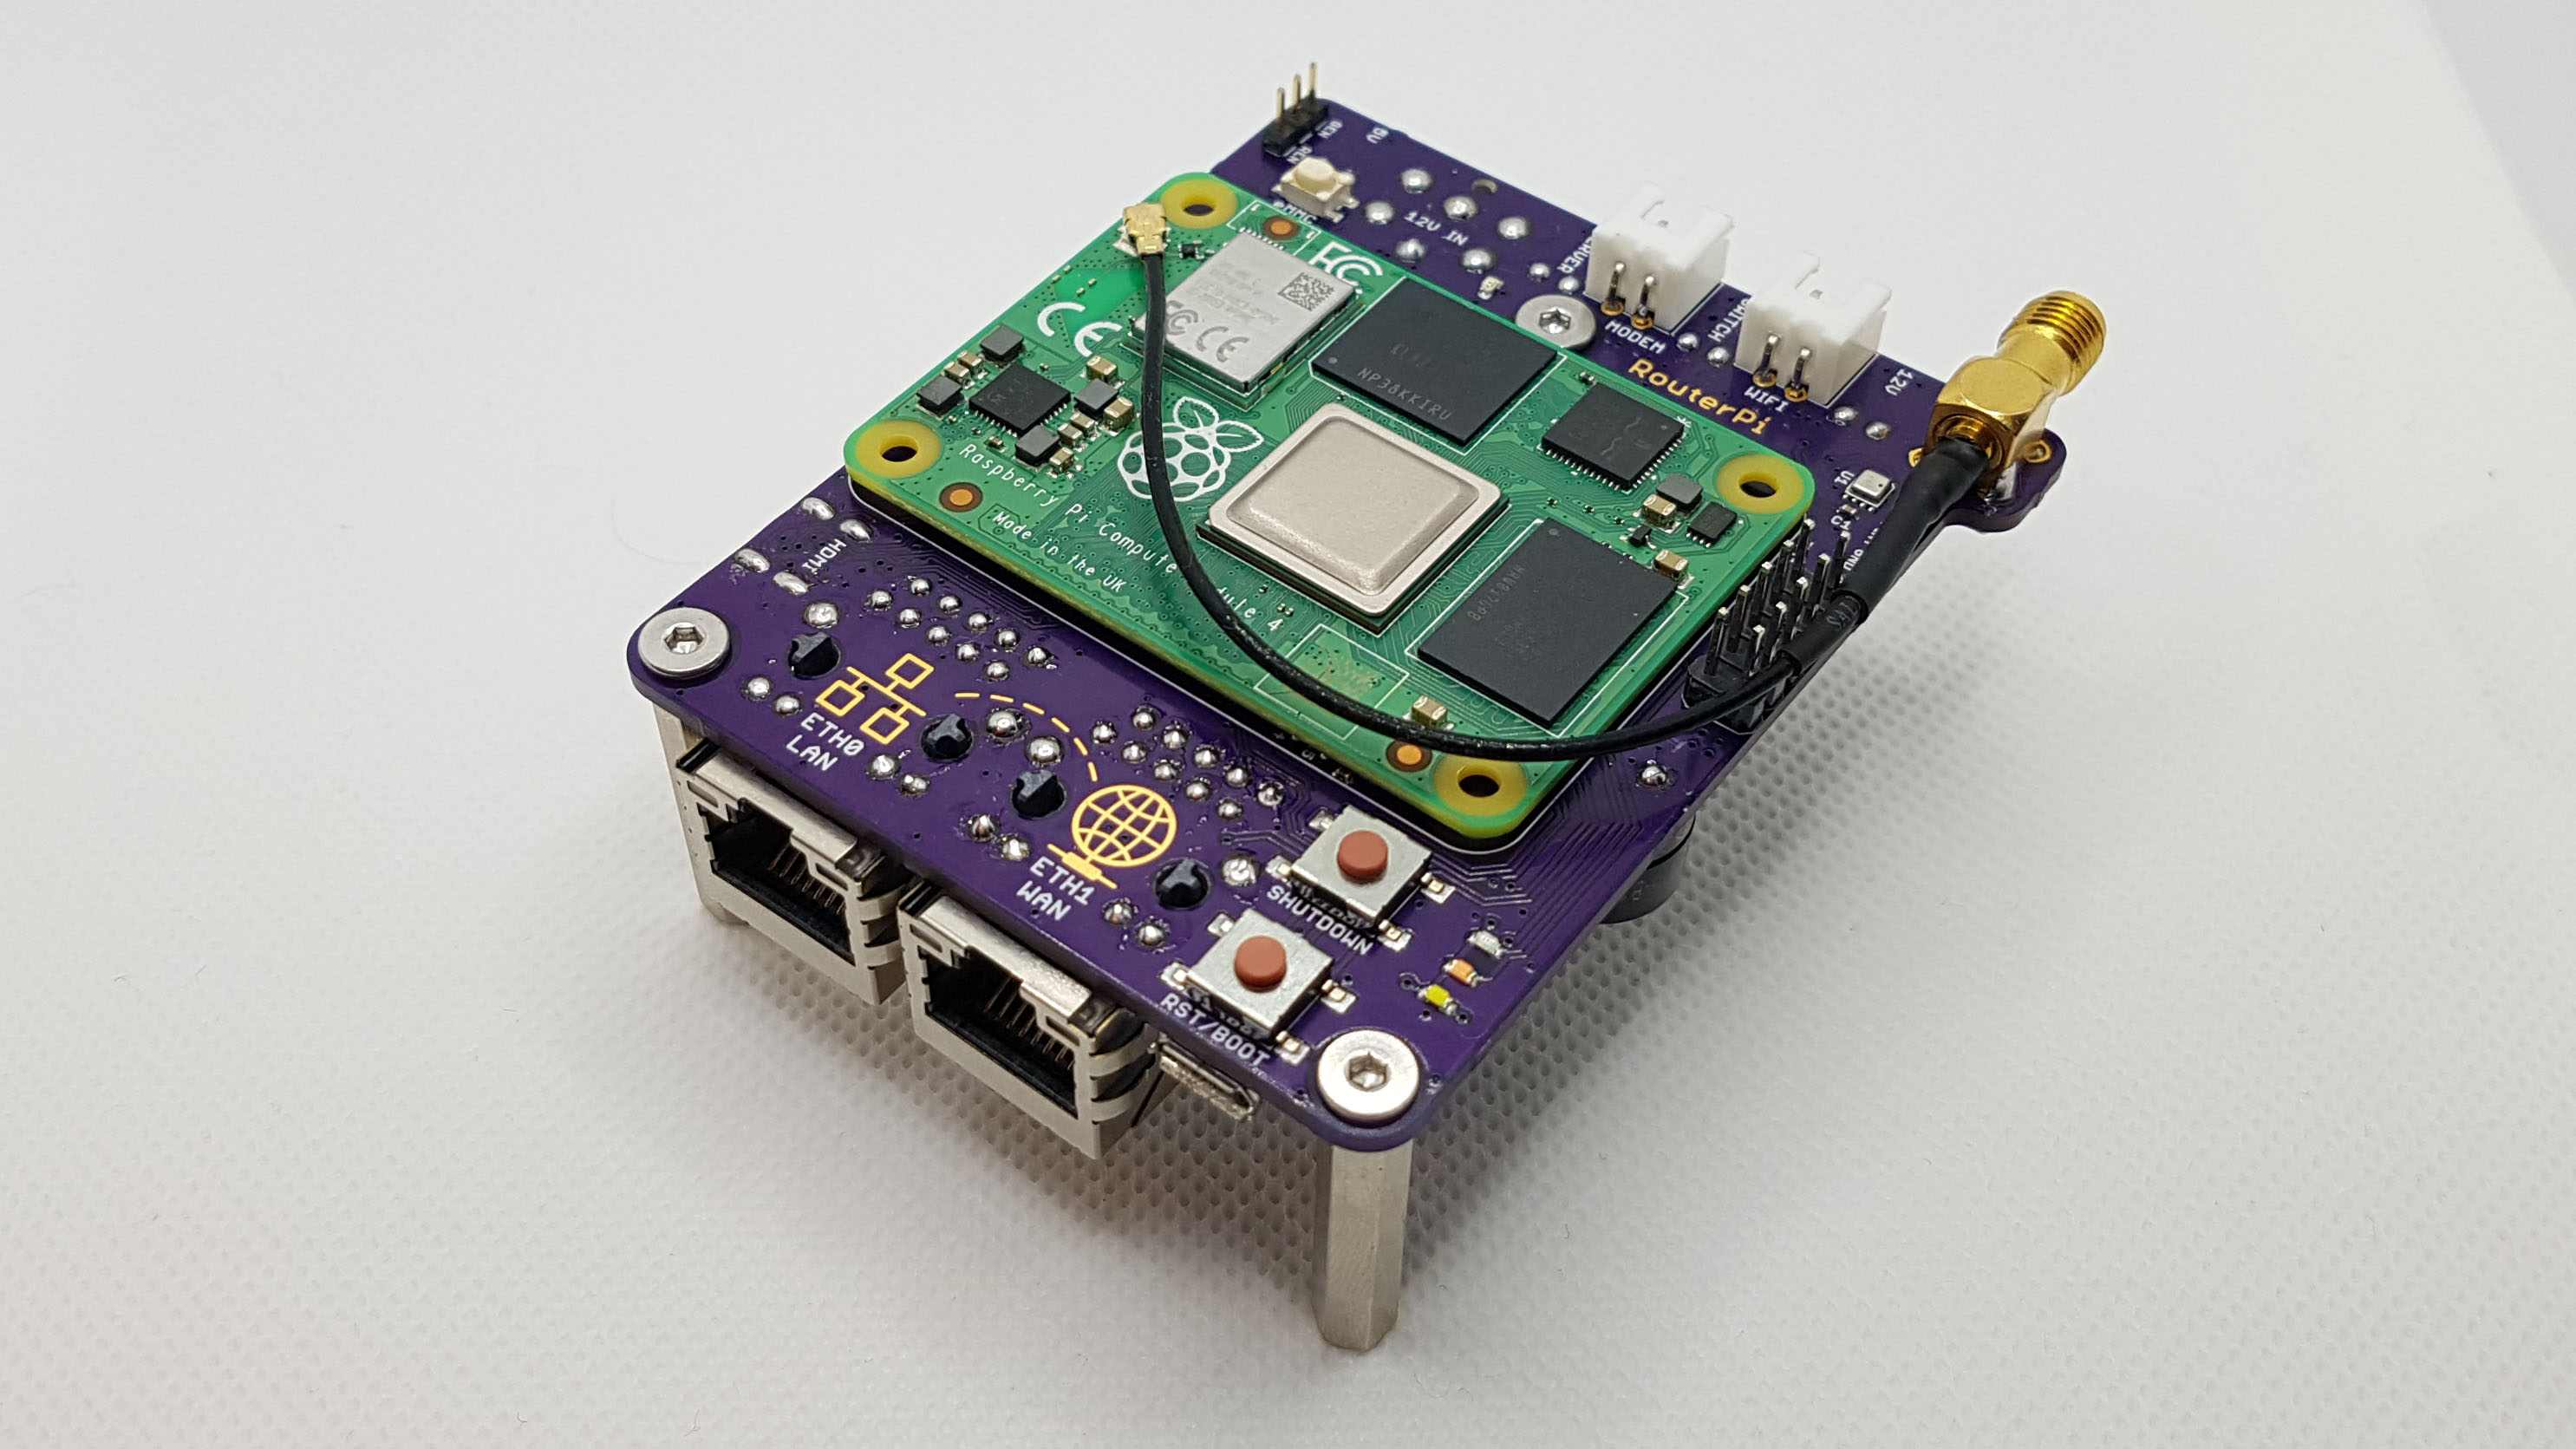
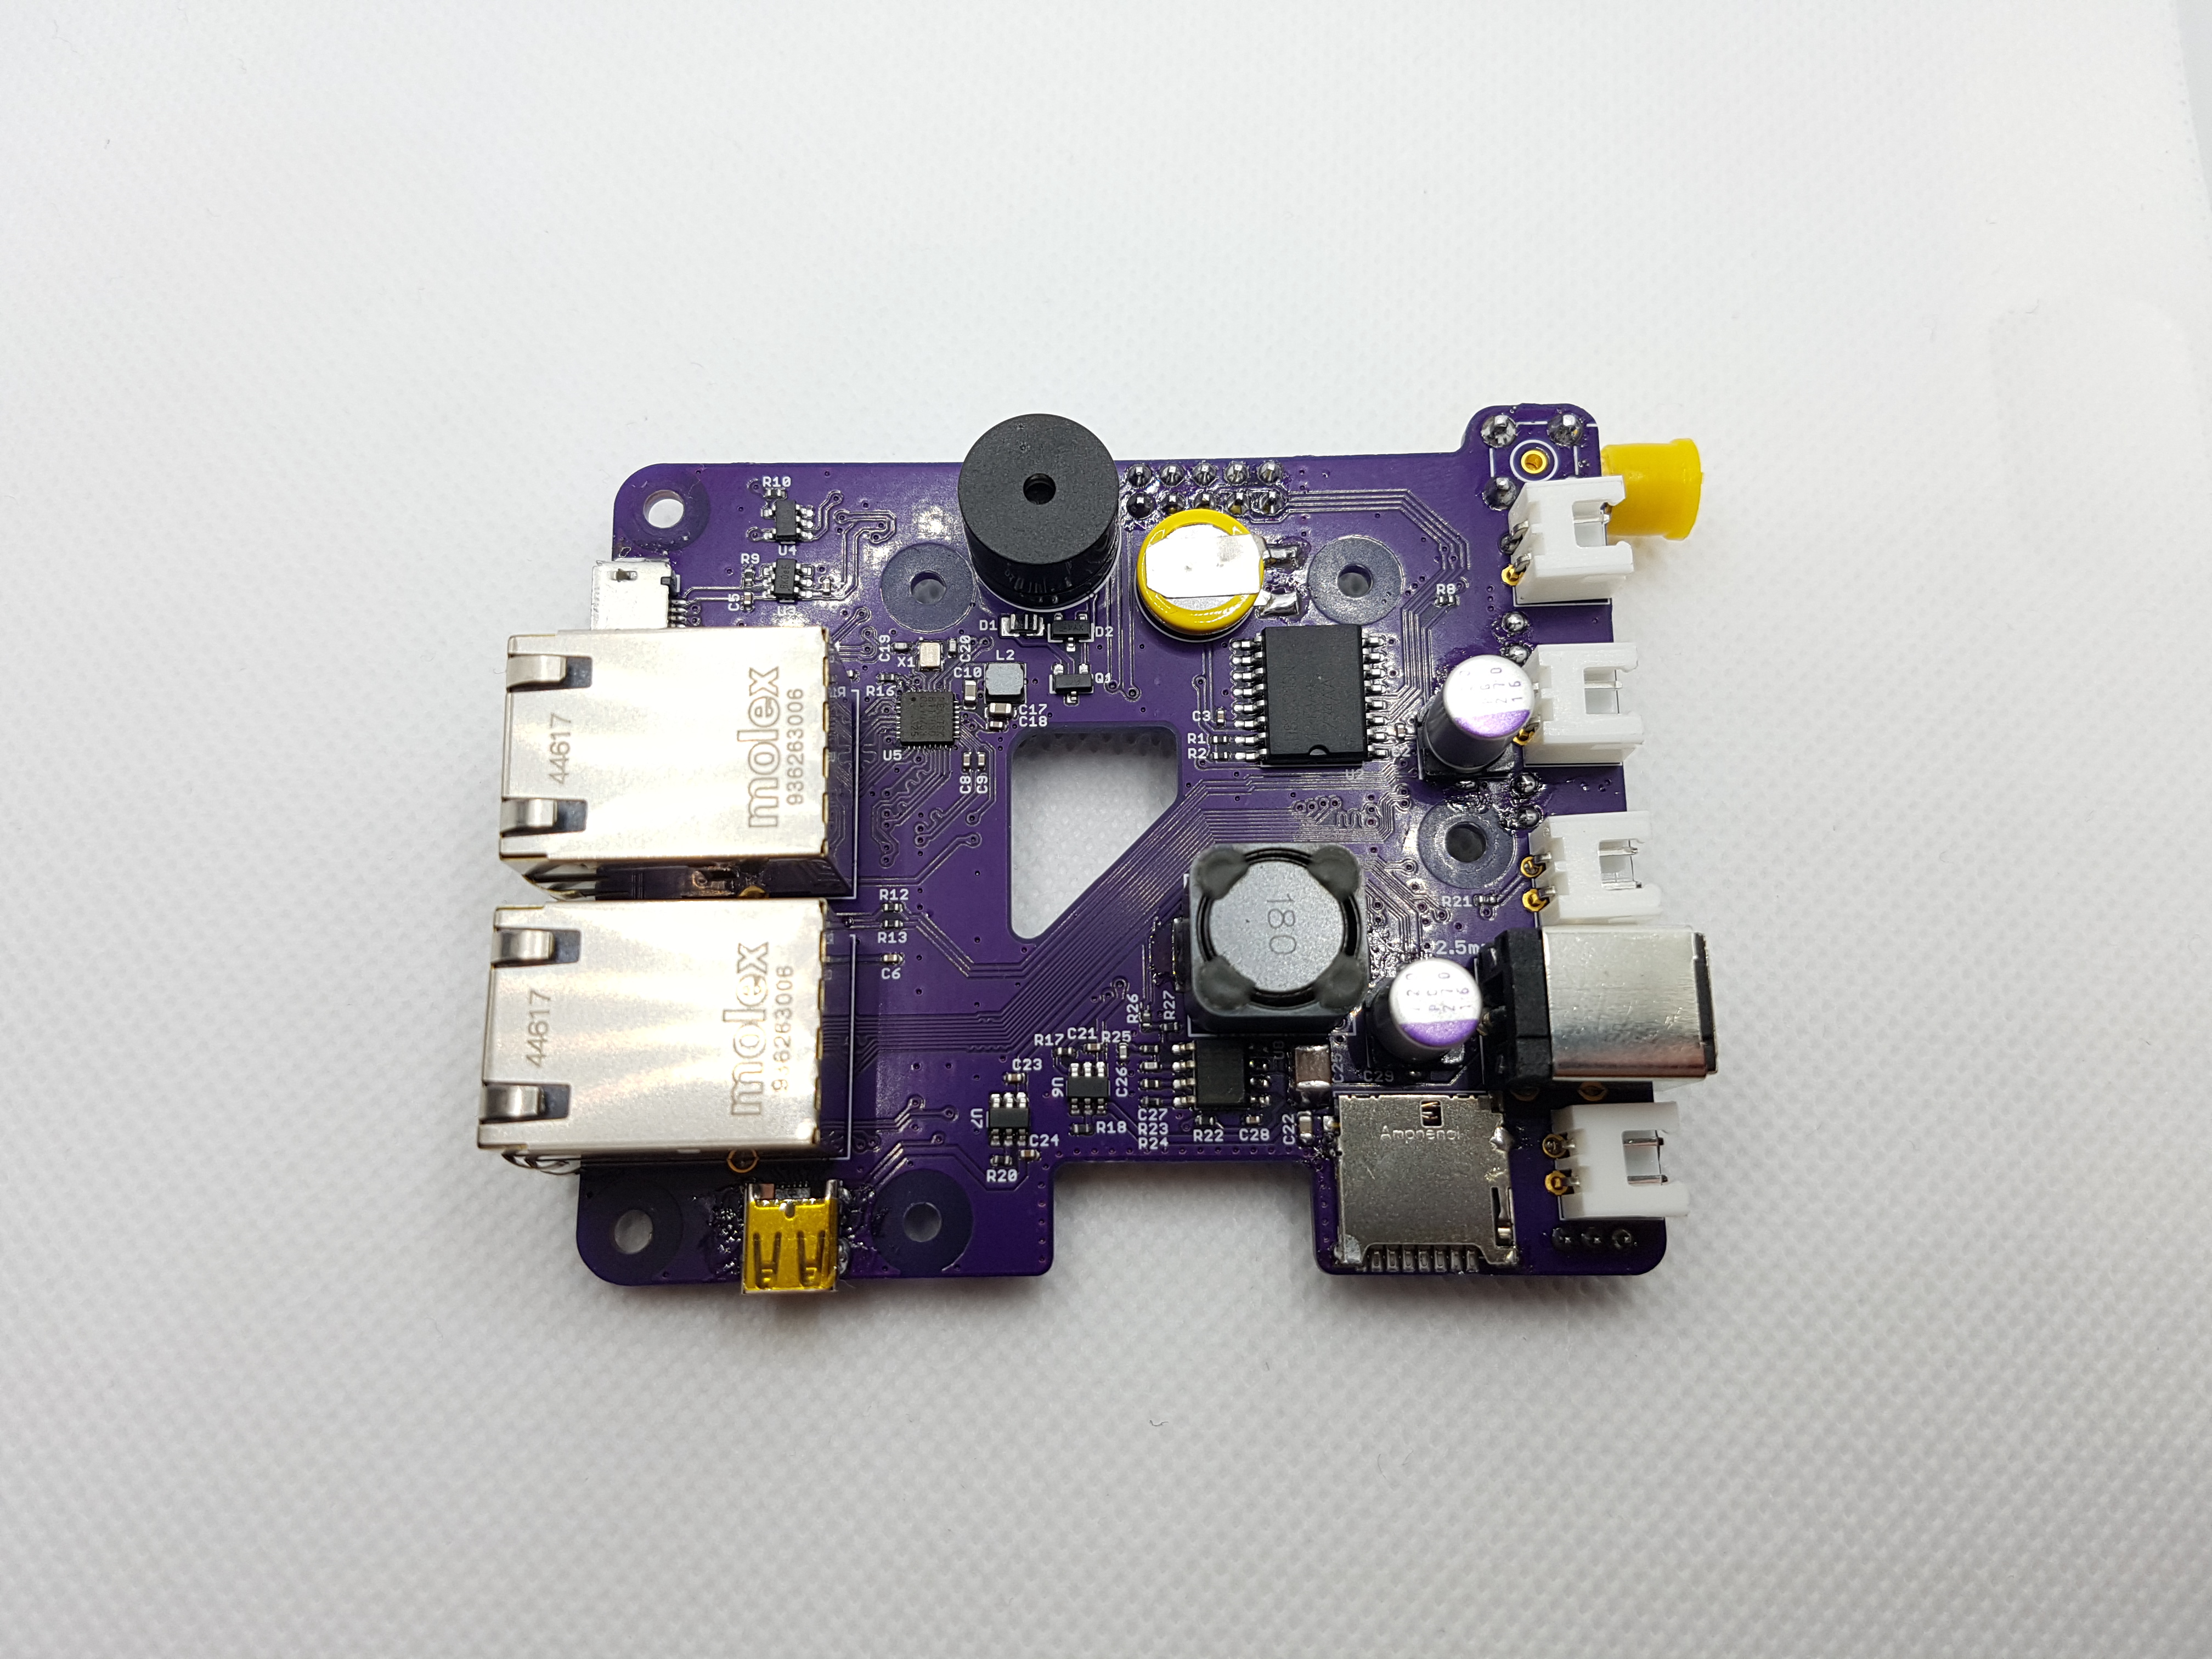
- Raspberry Pi Compute Module 4 with 2GB RAM & 8GB eMMC
- 2x Gigabit Ethernet interfaces (CM4 onboard & Realtek RTL8111HS)
- WiFi U.FL to SMA connector
- microHDMI port
- microUSB OTG port
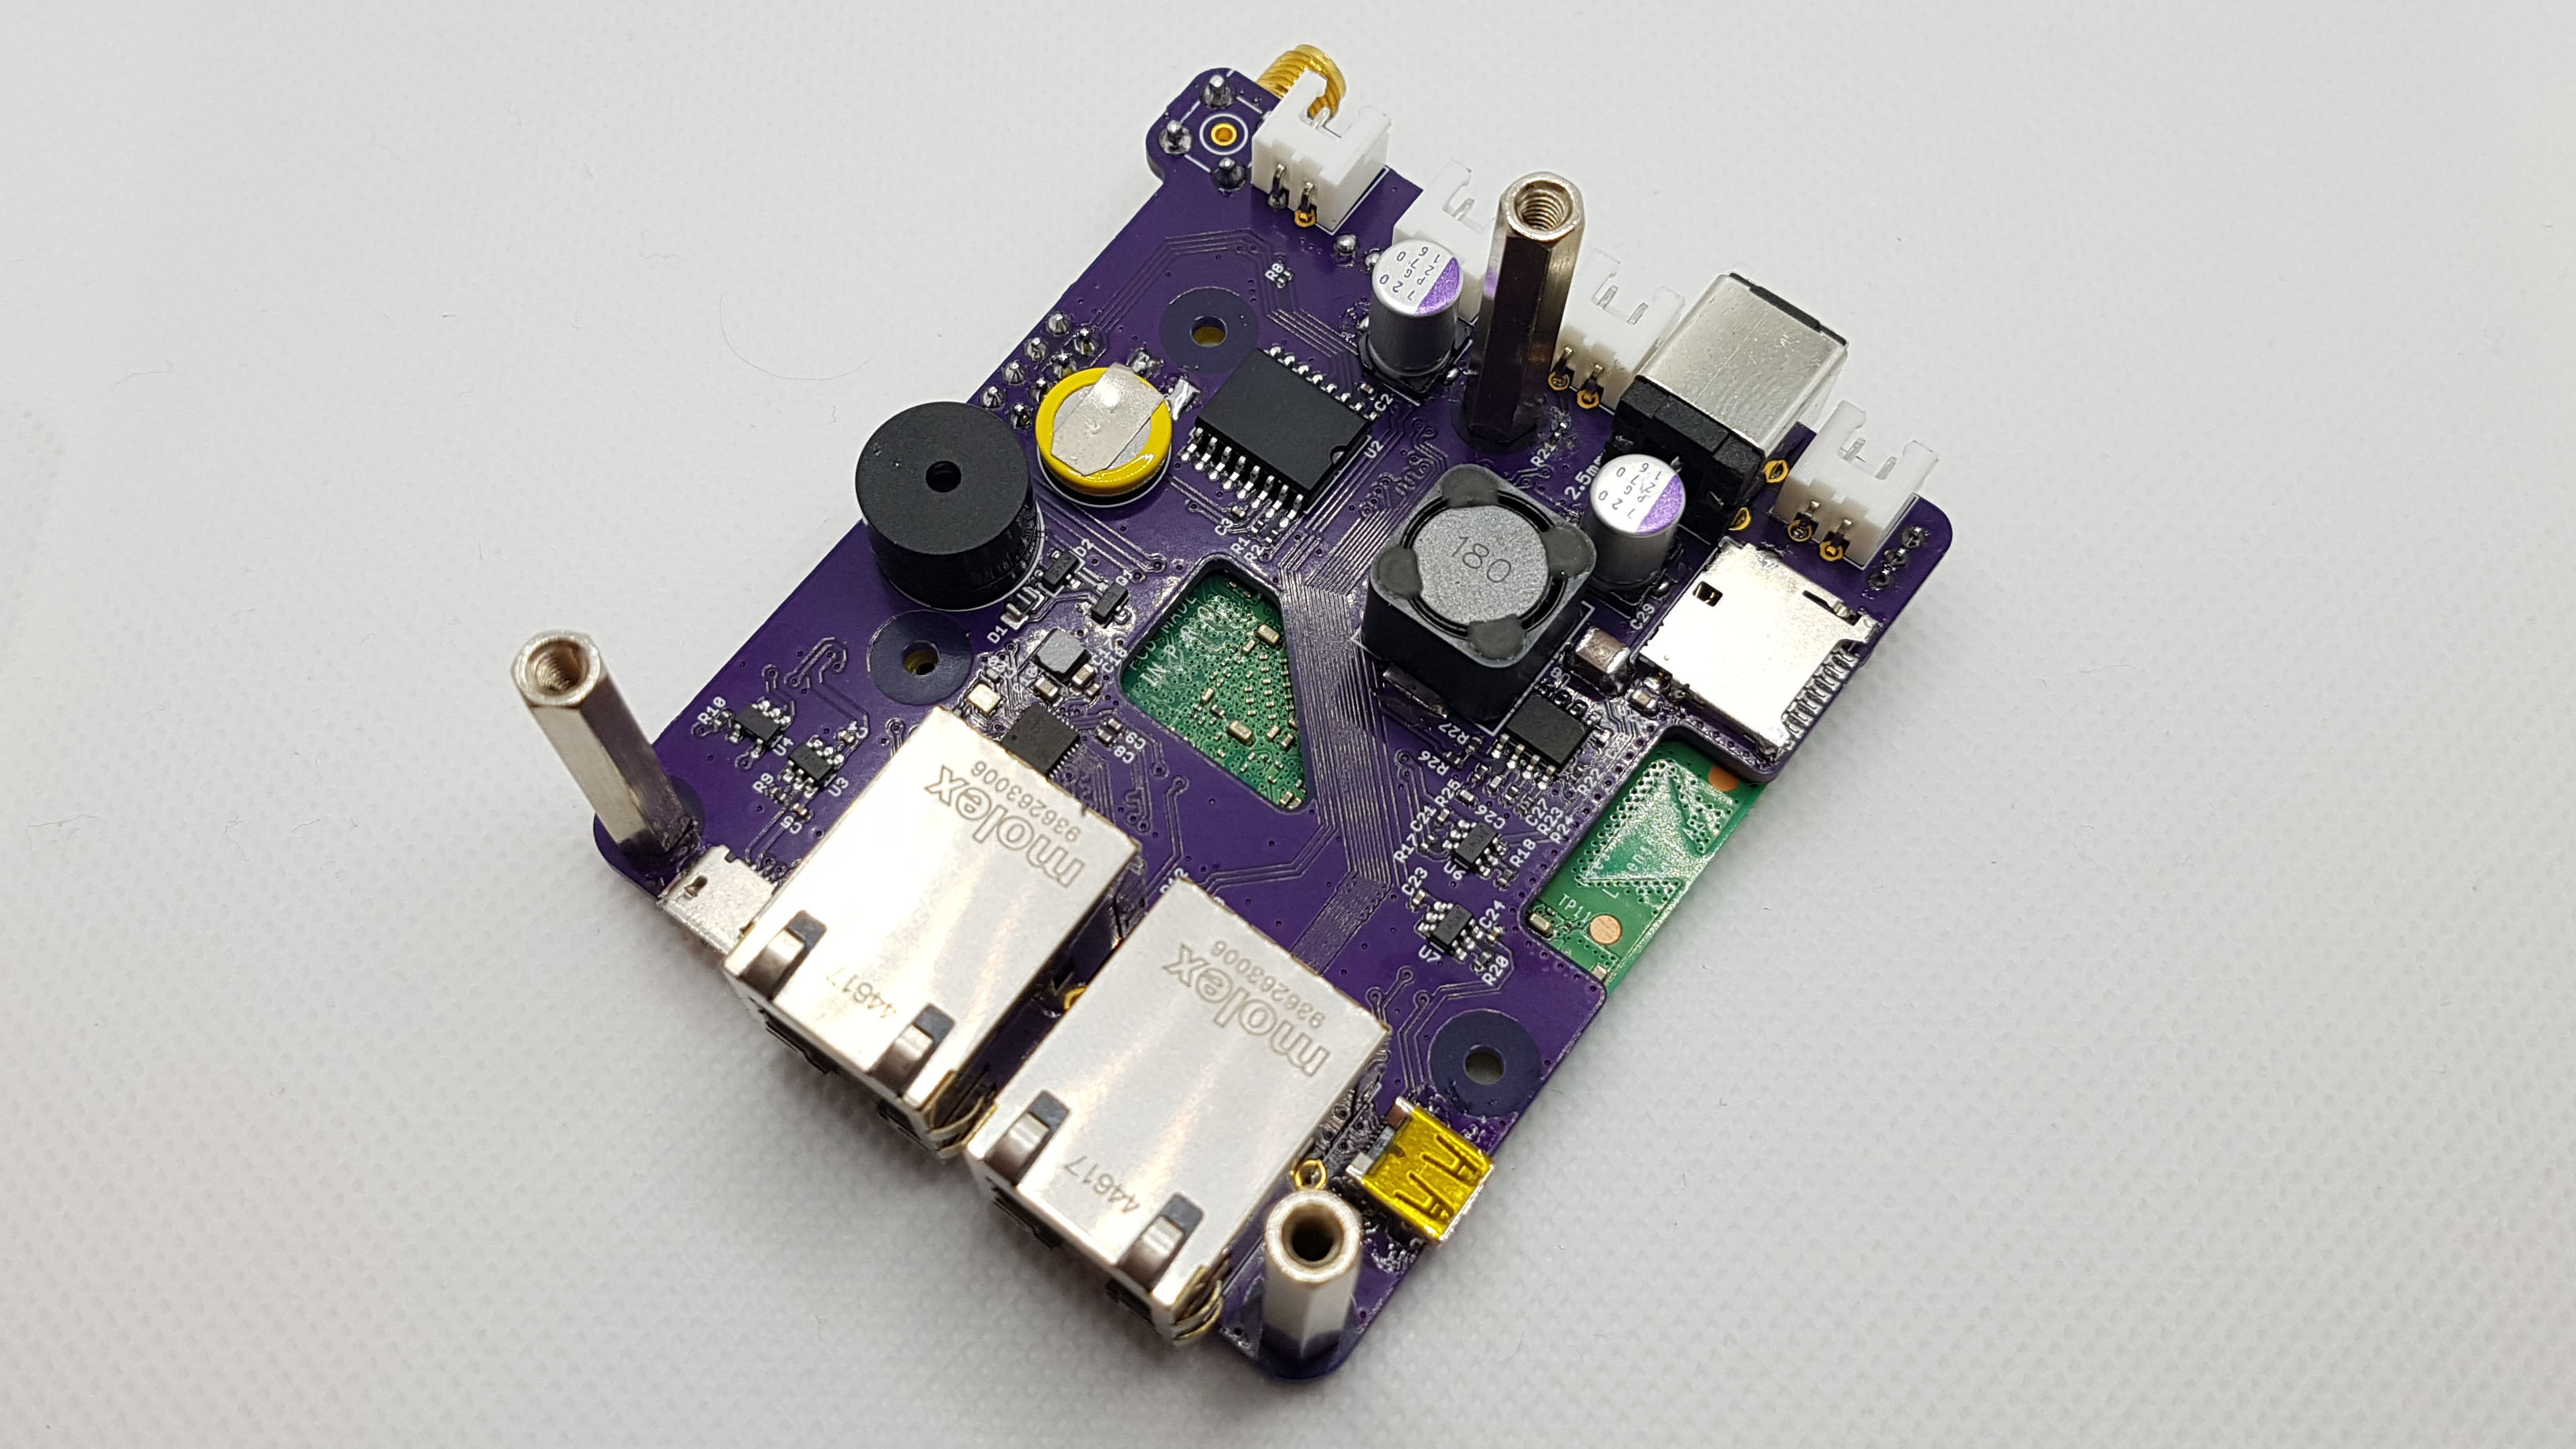
- DS3231 RTC with battery backup
- BME280 Environmental sensor
- 12V to 5V regulator
- Buzzer
- Buttons for safe shutdown and restart/boot
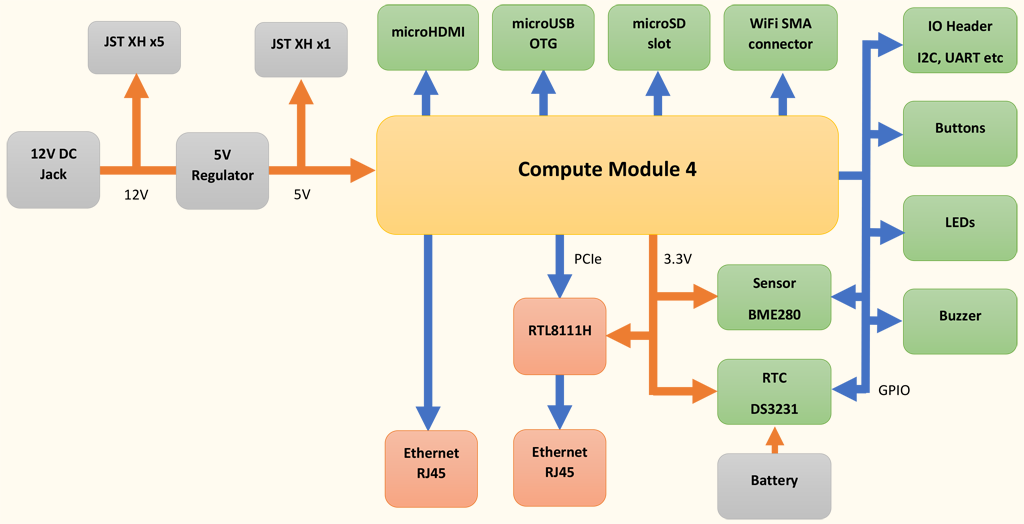
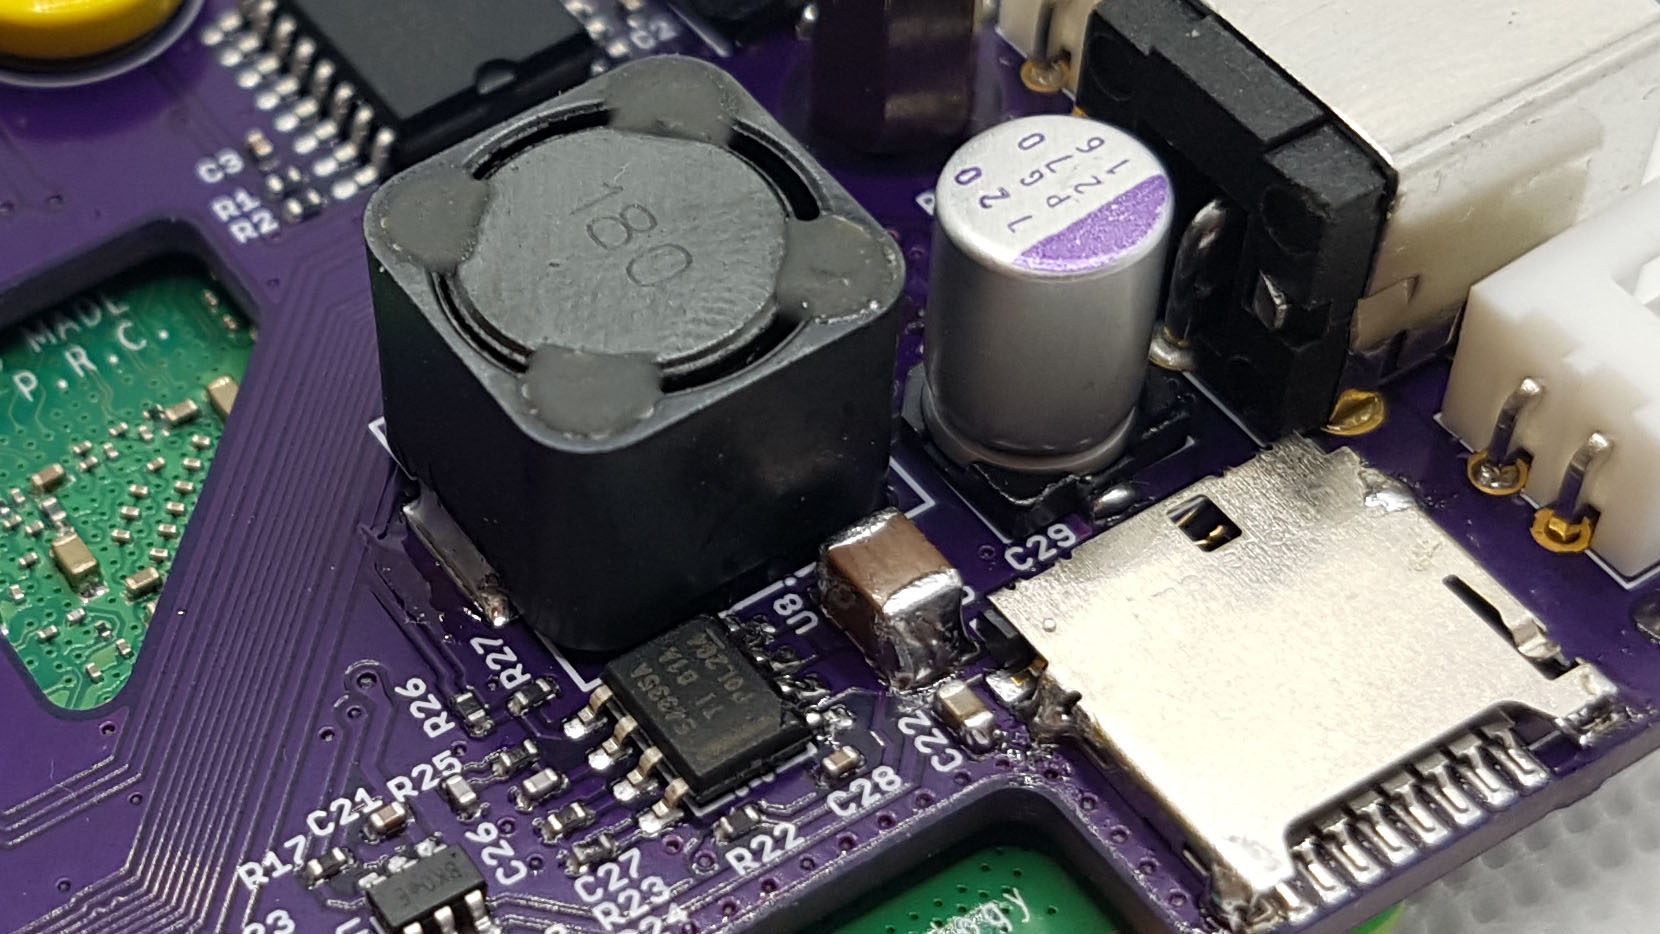
The RouterPi takes 12V in and regulates it down to 5V for the CM4. The 12V is also distributed out through some JST XH connectors to other pieces of networking equipment like the VDSL modem, network switch and WiFi access point. A Realtek RTL8111HS is used to provide the second Ethernet interface from the PCIe bus. There are buttons for safe shutdown and hard reset and a buzzer for playing short tunes on events like on a loss of internet connection.
The base board is a standard 1.6mm 2-layer PCB. This isn't really the kind of stack-up usually used when dealing with HDMI/PCIe/Ethernet/USB buses as the traces would have to be very thick to get the correct impendences, however I went with it and hoped for the best without bothering with impedance matching. I still made sure that the traces in each differential pair were the same length and ran next to each other of course. In the end everything worked fine, first time even! HDMI is able to output 4k video at 60FPS and PCIe and gigabit Ethernet has no issues.
Software Configuration
The router has the usual setup with iptables configured for NAT, uses VLAN/PPPoE for connection to my ISP and Pi-hole which deals with DHCP and DNS. The non-blocked DNS queries are forwarded to BIND configured as a recursive DNS resolver. I was originally going to use Unbound as the resolver, but I found it to be a bit flaky and would do annoying things like restart and lose its cache whenever a network interface came up or went down.
Performance
Now for the interesting part, how well does it work as a NAT router? To test this a few PCs were used to generate traffic through the router. One PC was connected to the LAN side and another on the WAN side. iperf 3.9 was used to generate the network traffic.
Starting an iperf server on each PC:
iperf3 -s
Beginning an iperf test to the other PC:
iperf3 -Z -c 10.0.x.x
Router Configuration:
OS: Raspberry Pi OS 10 (buster) Lite 2021-05-07 (32-bit)
Kernel: 5.10.63-v8+ (64-bit)
RTL Driver: r8168 v8.049.02
CPU Max Clock: 1.5 GHz (standard, no overclocking)
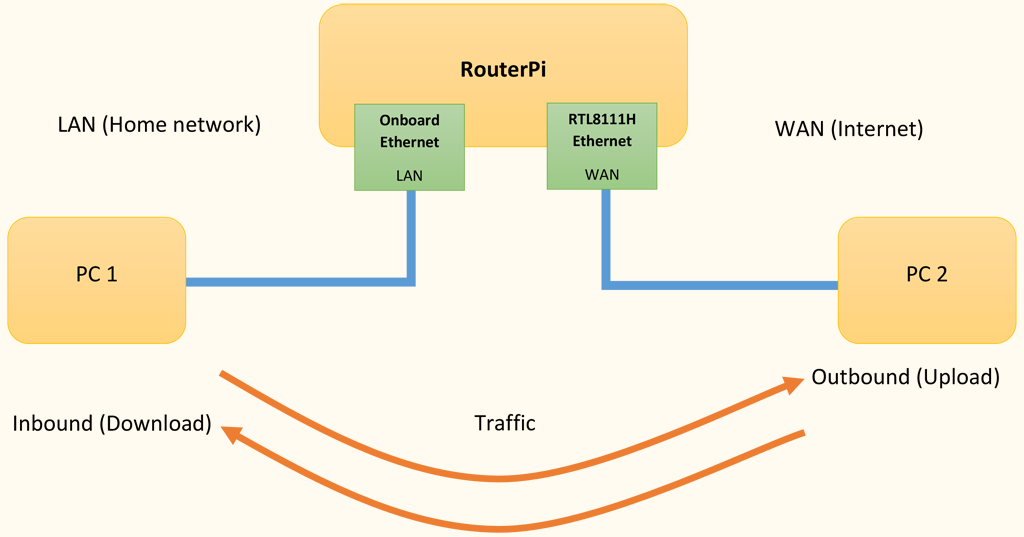
Inbound traffic is received by the RTL8111H interface and sent out of the onboard interface. Outbound is the opposite, received by the onboard interface and transmitted out of the RTL8111H. Generally, receiving packets is a more CPU intensive task than sending packets.
Some of these tests involved generating traffic in both directions at the same time. A problem here was that if the link becomes fully saturated in one direction, then this caused problems with getting TCP ACKs back to the other end. This resulted with the transfer rate for one test slowing down to a crawl while the other test continued at full speed.
A few things could have been done to fix this; iperf3 bandwidth could have been limited with -b 880m or the router could have been configured with some traffic shaping to slightly limit bandwidth and prioritise ACK packets. However, in these tests I just kept restarting iperf until the timing was just right that both directions managed to saturate the link, hah.
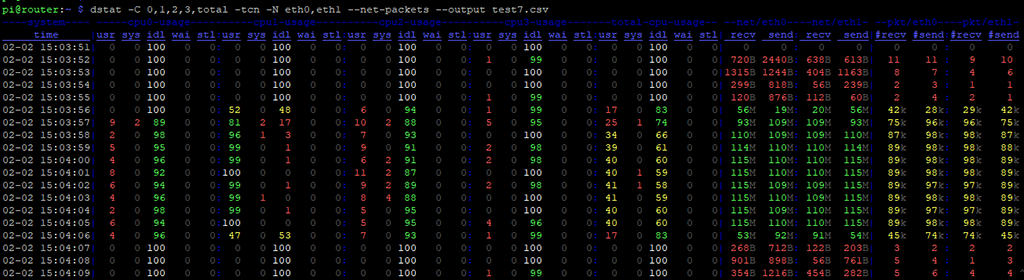
Dstat was used to record the CPU usage, network utilisation and packet counts on the router during the iperf tests.
dstat -C 0,1,2,3,total -tcn -N eth0,eth1 --net-packets --output data.csv
Bandwidth
At first the routing performance wasn't quite what I was hoping for. While it could route at gigabit speeds in one direction at a time, it had problems with gigabit in both directions simultaneously.
| Direction | Bandwidth (Mbps) | PPS | CPU0 % | CPU1 % | CPU2 % | CPU3 % |
|---|---|---|---|---|---|---|
| Inbound (download) | 928 | 80.5k | 55 | 0 | 2 | 0 |
| Outbound (upload) | 932 | 81k | 100 | 0 | 0 | 0 |
| Inbound & outbound | In: 247 Out: 887 |
In: 27k Out: 85k |
100 | 1 | 1 | 1 |
CPU0 was struggling to keep up with the workload while the other 3 CPUs sat around not doing very much. After a bit of research, I found that the network interface interrupt IRQs and packet queues could be assigned to different CPUs, called receive packet steering (RPS). By default, everything runs on CPU0 which quickly starts to choke the system.
The following few commands will reassign interrupts and queues like so:
| CPU | Task |
|---|---|
| 0 | eth1 PCIe interrupt (cannot be changed from CPU0) |
| 1 | eth0 receive interrupt |
| 2 | eth0 transmit interrupt |
| 3 | eth1 receive queue |
echo 2 | sudo tee /proc/irq/41/smp_affinity
echo 4 | sudo tee /proc/irq/42/smp_affinity
echo 8 | sudo tee /sys/class/net/eth1/queues/rx-0/rps_cpus
The IRQ numbers 41 and 42 can move around depending on what's connected to the system. Use cat /proc/interrupts | grep eth0 to find the correct IRQs. There are a few other RX and TX queues, but changing their CPU affinities either had no effect or made things worse.
| Direction | Bandwidth (Mbps) | PPS | CPU0 % | CPU1 % | CPU2 % | CPU3 % |
|---|---|---|---|---|---|---|
| Inbound (download) | 935 | 81k | 1 | 0 | 10 | 0 |
| Outbound (upload) | 934 | 81k | 1 | 100 | 0 | 1 |
| Inbound & outbound | In: 937 Out: 923 |
In: 85k Out: 84k |
3 | 99 | 10 | 1 |
Perfect, gigabit routing in both directions at the same time! It looks like CPU1 can just about manage with dealing with all of the receive interrupts for the onboard ethernet. The RTL8111H seems to be much more efficient with pretty much no CPU usage (CPU0 and CPU3).
UPDATE August 2022:
I recently found out about interrupt coalescing which is supported by the onboard Ethernet driver. It's mostly disabled by default so an interrupt is generated on almost every packet received, increasing CPU load.
sudo ethtool -C eth0 rx-usecs 100 rx-frames 10will allow up to 10 packets to buffer up or until 100us has elapsed since the first packet before generating an interrupt. A quick test usingsysbench cpu --threads=4 runbefore and after enabling coalescing while gigabit routing (outbound) showed a ~14% benchmark performance improvement. There was no change in networking performance since the connection was already maxed out.
The r8168 driver for eth1 has its own form of coalescing already enabled, but the r8169 driver that now ships with RPi OS (since 2022-01-28 release) has coalescing disabled by default again. Usesudo ethtool -C eth1 rx-usecs 100 rx-frames 10 tx-usecs 100 tx-frames 10to enable it.
Packets Per Second
Bandwidth is not the only performance metric when it comes to networking equipment, there's also the number of individual packets that the device can process each second, referred to as Packets per Second or PPS. Processing lots of small packets is a much more difficult task, so let's see how the Pi handles it.
The TCP payload size was configured using the -M/--set-mss option in iperf3 which was limited to a minimum of 88 bytes for a total frame size of 142 bytes plus a 4 byte FCS. When the frame is transmitted on the physical wire a 7 byte preamble and 1 byte frame delimiter is added and then there's a minimum gap of 12 bytes between frames.
Overall, it takes 166 bytes to transmit a TCP packet containing an 88 byte payload. This gives us a maximum of 753,012 PPS across a gigabit connection.
iperf3 -Z -M 88 -c 10.0.x.x
| Direction | Bandwidth (Mbps) | PPS | CPU0 % | CPU1 % | CPU2 % | CPU3 % |
|---|---|---|---|---|---|---|
| Inbound (download) | 246 | 225k | 6 | 4 | 60 | 100 |
| Outbound (upload) | 167 | 154k | 1 | 99 | 0 | 0 |
| Inbound & outbound | In: 207 Out: 134 |
In: 185k Out: 130k |
9 | 95 | 45 | 10 |
It seems that the Pi doesn't perform too well when dealing with a lot of small packets. The RTL8111H is again more efficient and outperforms the onboard Ethernet by roughly 45%. Luckily, this type of traffic is not really something that would be seen on a home network.
Power Consumption
The power draw at the 12V input was measured with various workloads. The actual CM4 power draw will be ~7% less due to the 5V regulator inefficiency. HDMI was not connected.
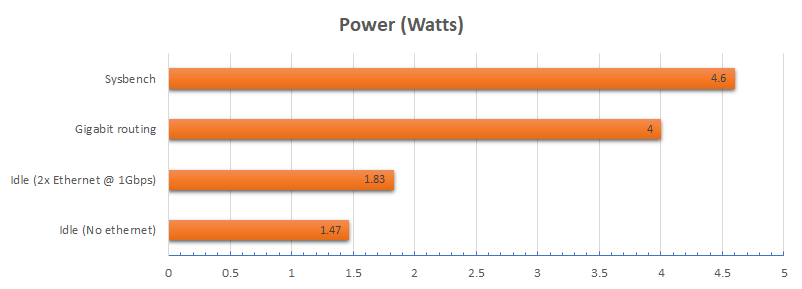
Gigabit routing is in both directions simultaneously.
Sysbench v1.1.0: sysbench --threads=4 --time=60 memory run
The memory benchmark was used since it had a higher power draw than the cpu benchmark. The GPU was not tested so the maximum power draw of the CM4 could still be a few watts higher.
An idle power draw of 1.83W is a nice improvement from 5.5W of the old Intel N3050 system.
Regulator Efficiency
A TI TPS54335A 3A switching regulator is used to convert 12V down to 5V for powering the Compute Module 4.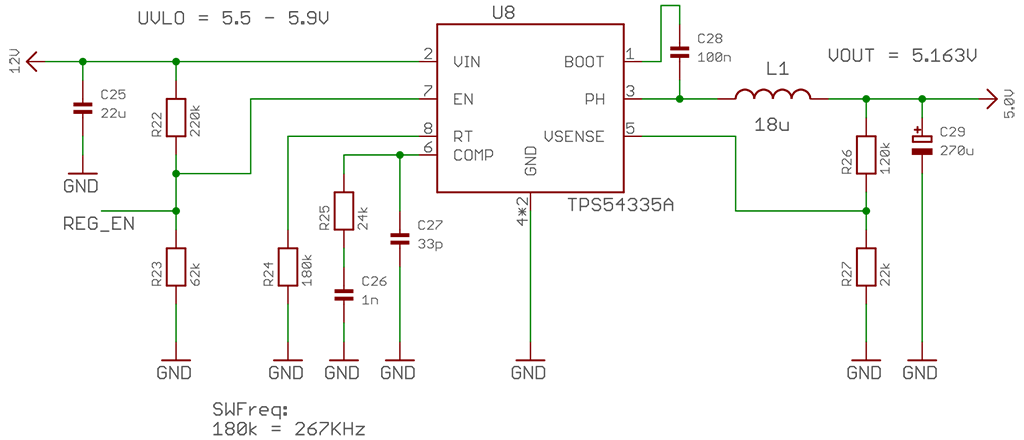
| In current | 12V | Power | -> | Out current | 5V | Power | = | Effeciency |
|---|---|---|---|---|---|---|---|---|
| 69mA | 11.98V | 0.826V | -> | 143mA | 5.17V | 0.739W | = | 89.5% |
| 196mA | 11.96V | 2.34V | -> | 422mA | 5.17V | 2.18W | = | 93% |
| 273mA | 11.94V | 3.26V | -> | 591mA | 5.17V | 3.05W | = | 93.5% |
Efficiency is pretty good at over 90% and only falling just below at light loads which is expected. However, TI's WeBench tool suggests that efficiency should have been around 95-96% with the components that I used.
Temperatures
A quick look at idle temperatures using a passive heatsink.
| Location | Temperature |
|---|---|
| Ambient | 24.7°C |
| CPU | 45.2°C |
| PMIC | 53.3°C |
| RTC | 39.75°C |
| BME280 | 36.93°C |
With a passive heatsink the CM4 can only sustain continuous gigabit routing in both directions for a few minutes before the CPU reaches 80°C and starts throttling, at which point the routing performance drops.
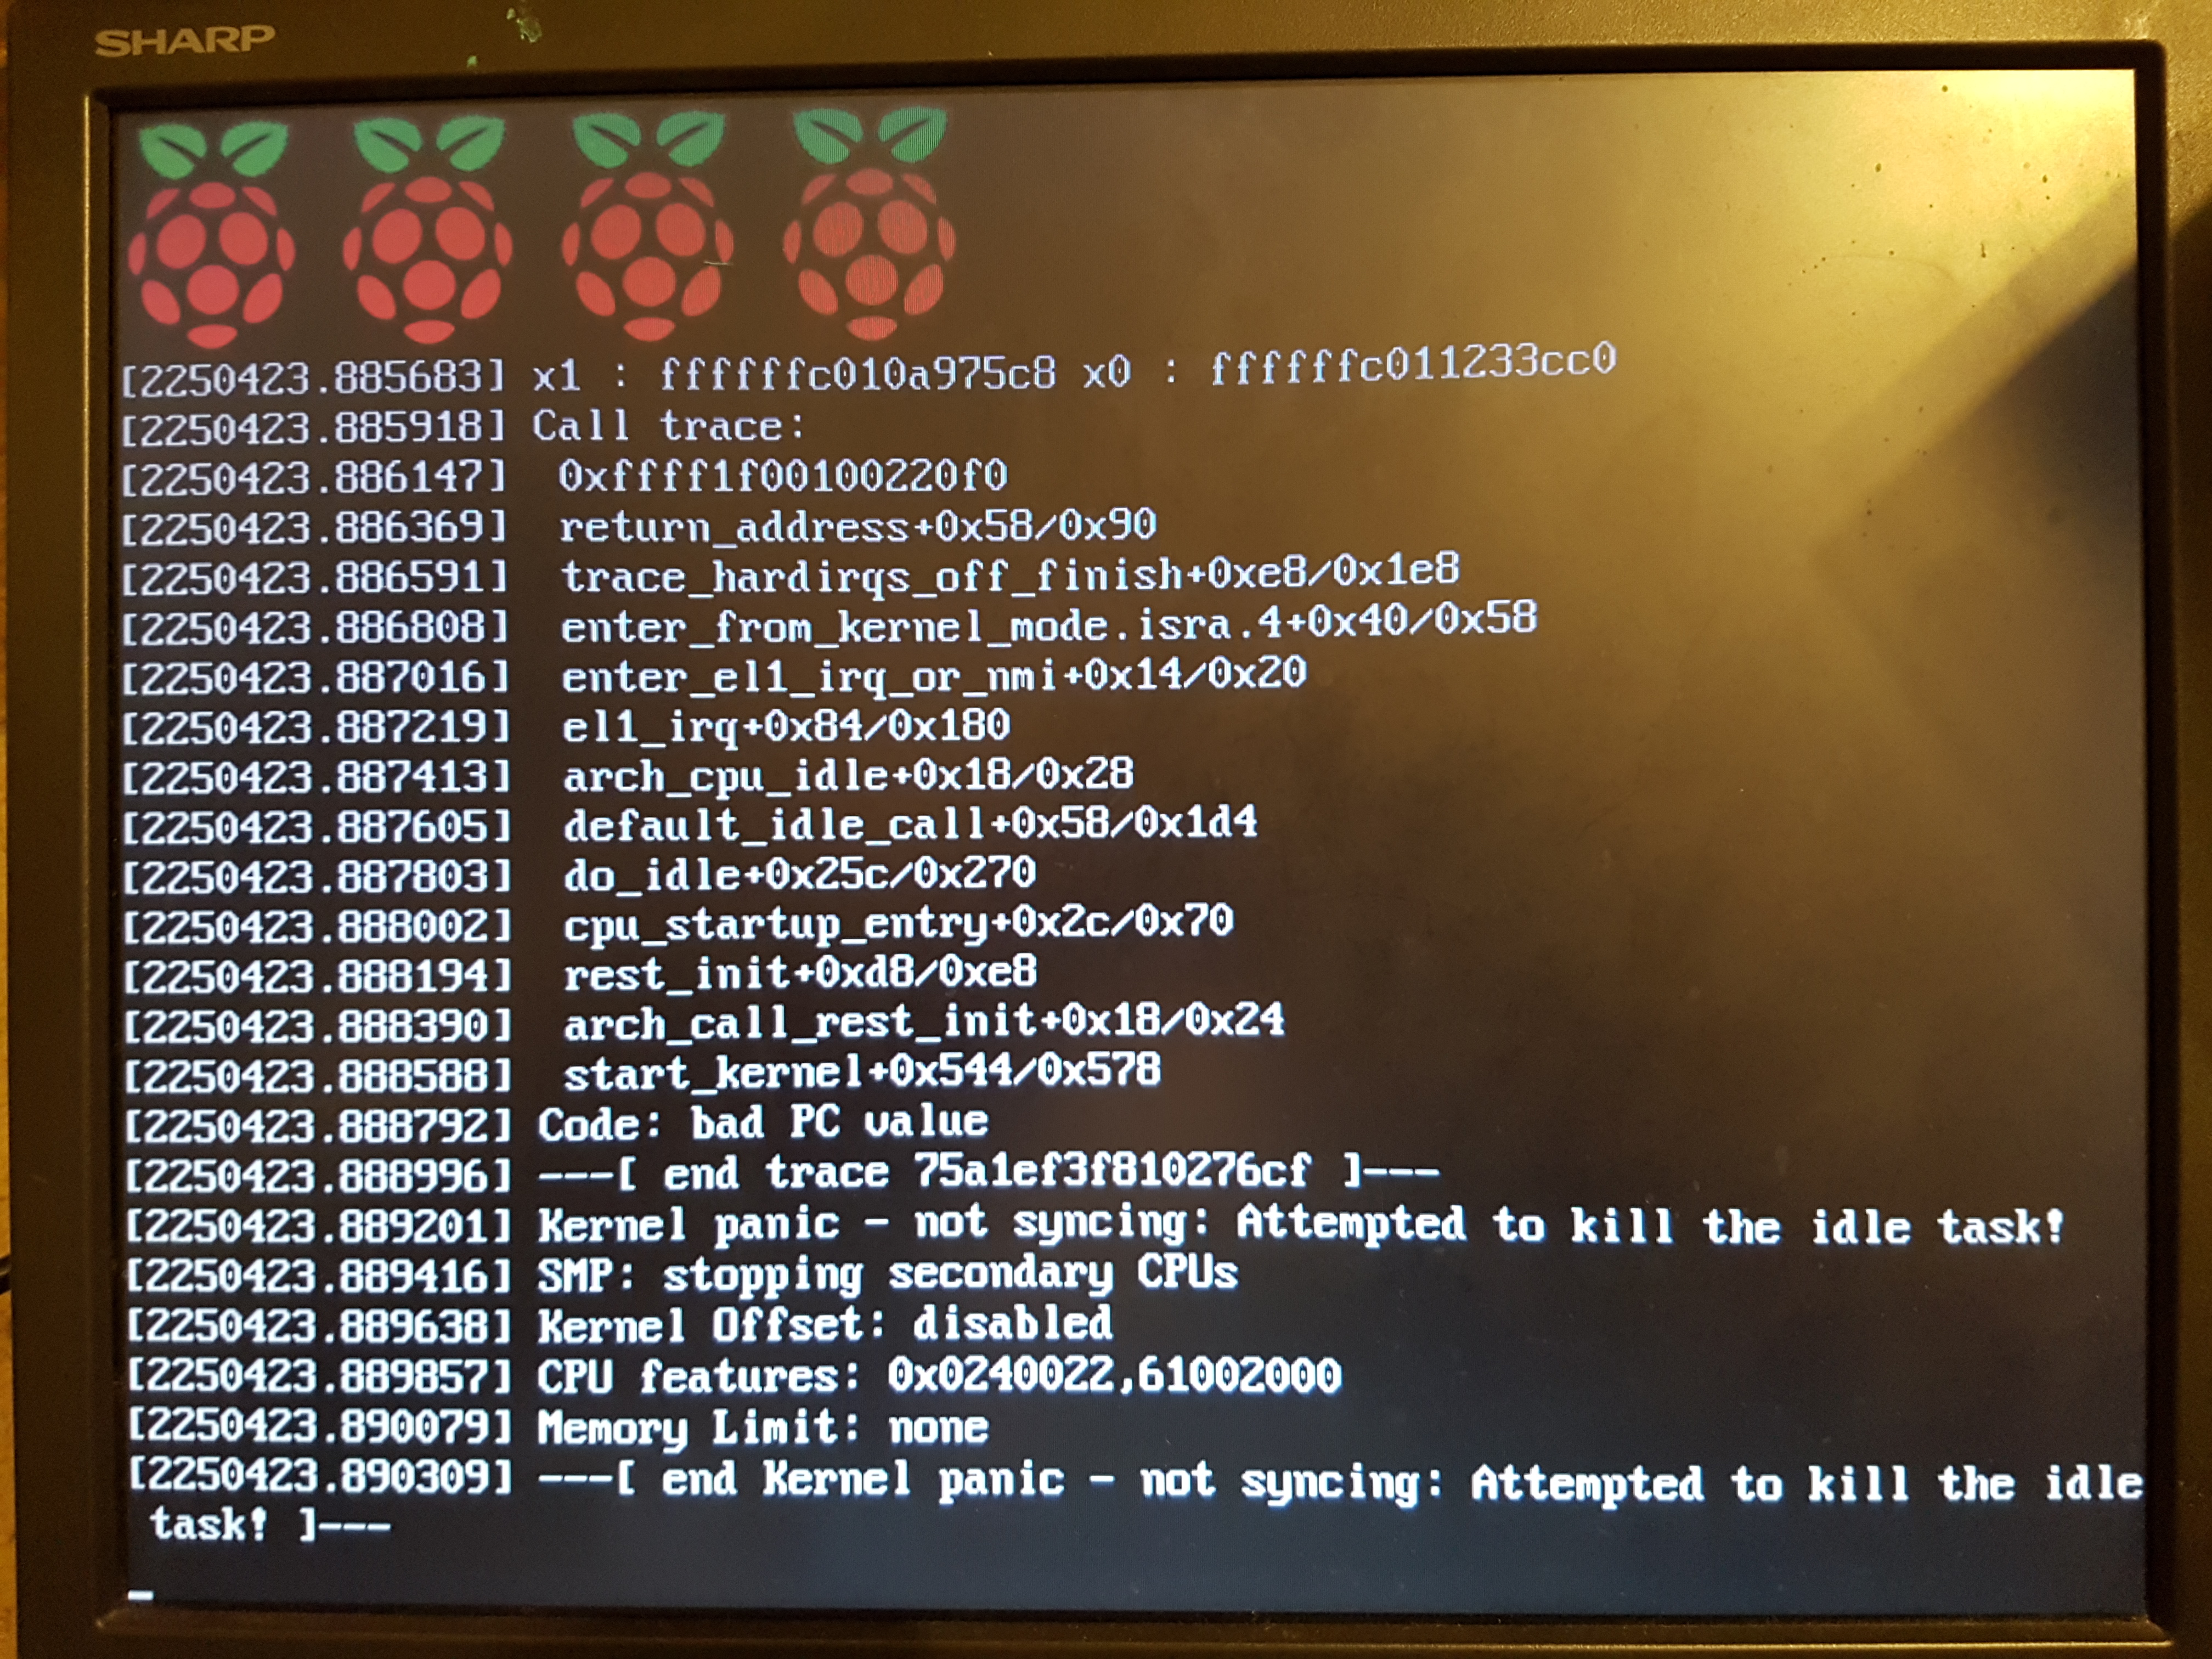
Stability
The RouterPi has been very stable since I first set it up almost a year ago. Only once did it have a kernel panic roughly a month after it was first installed, but I think this could have just been something like a connector pin moving into place causing a momentary glitch.
This was the only information about the panic that I could get:
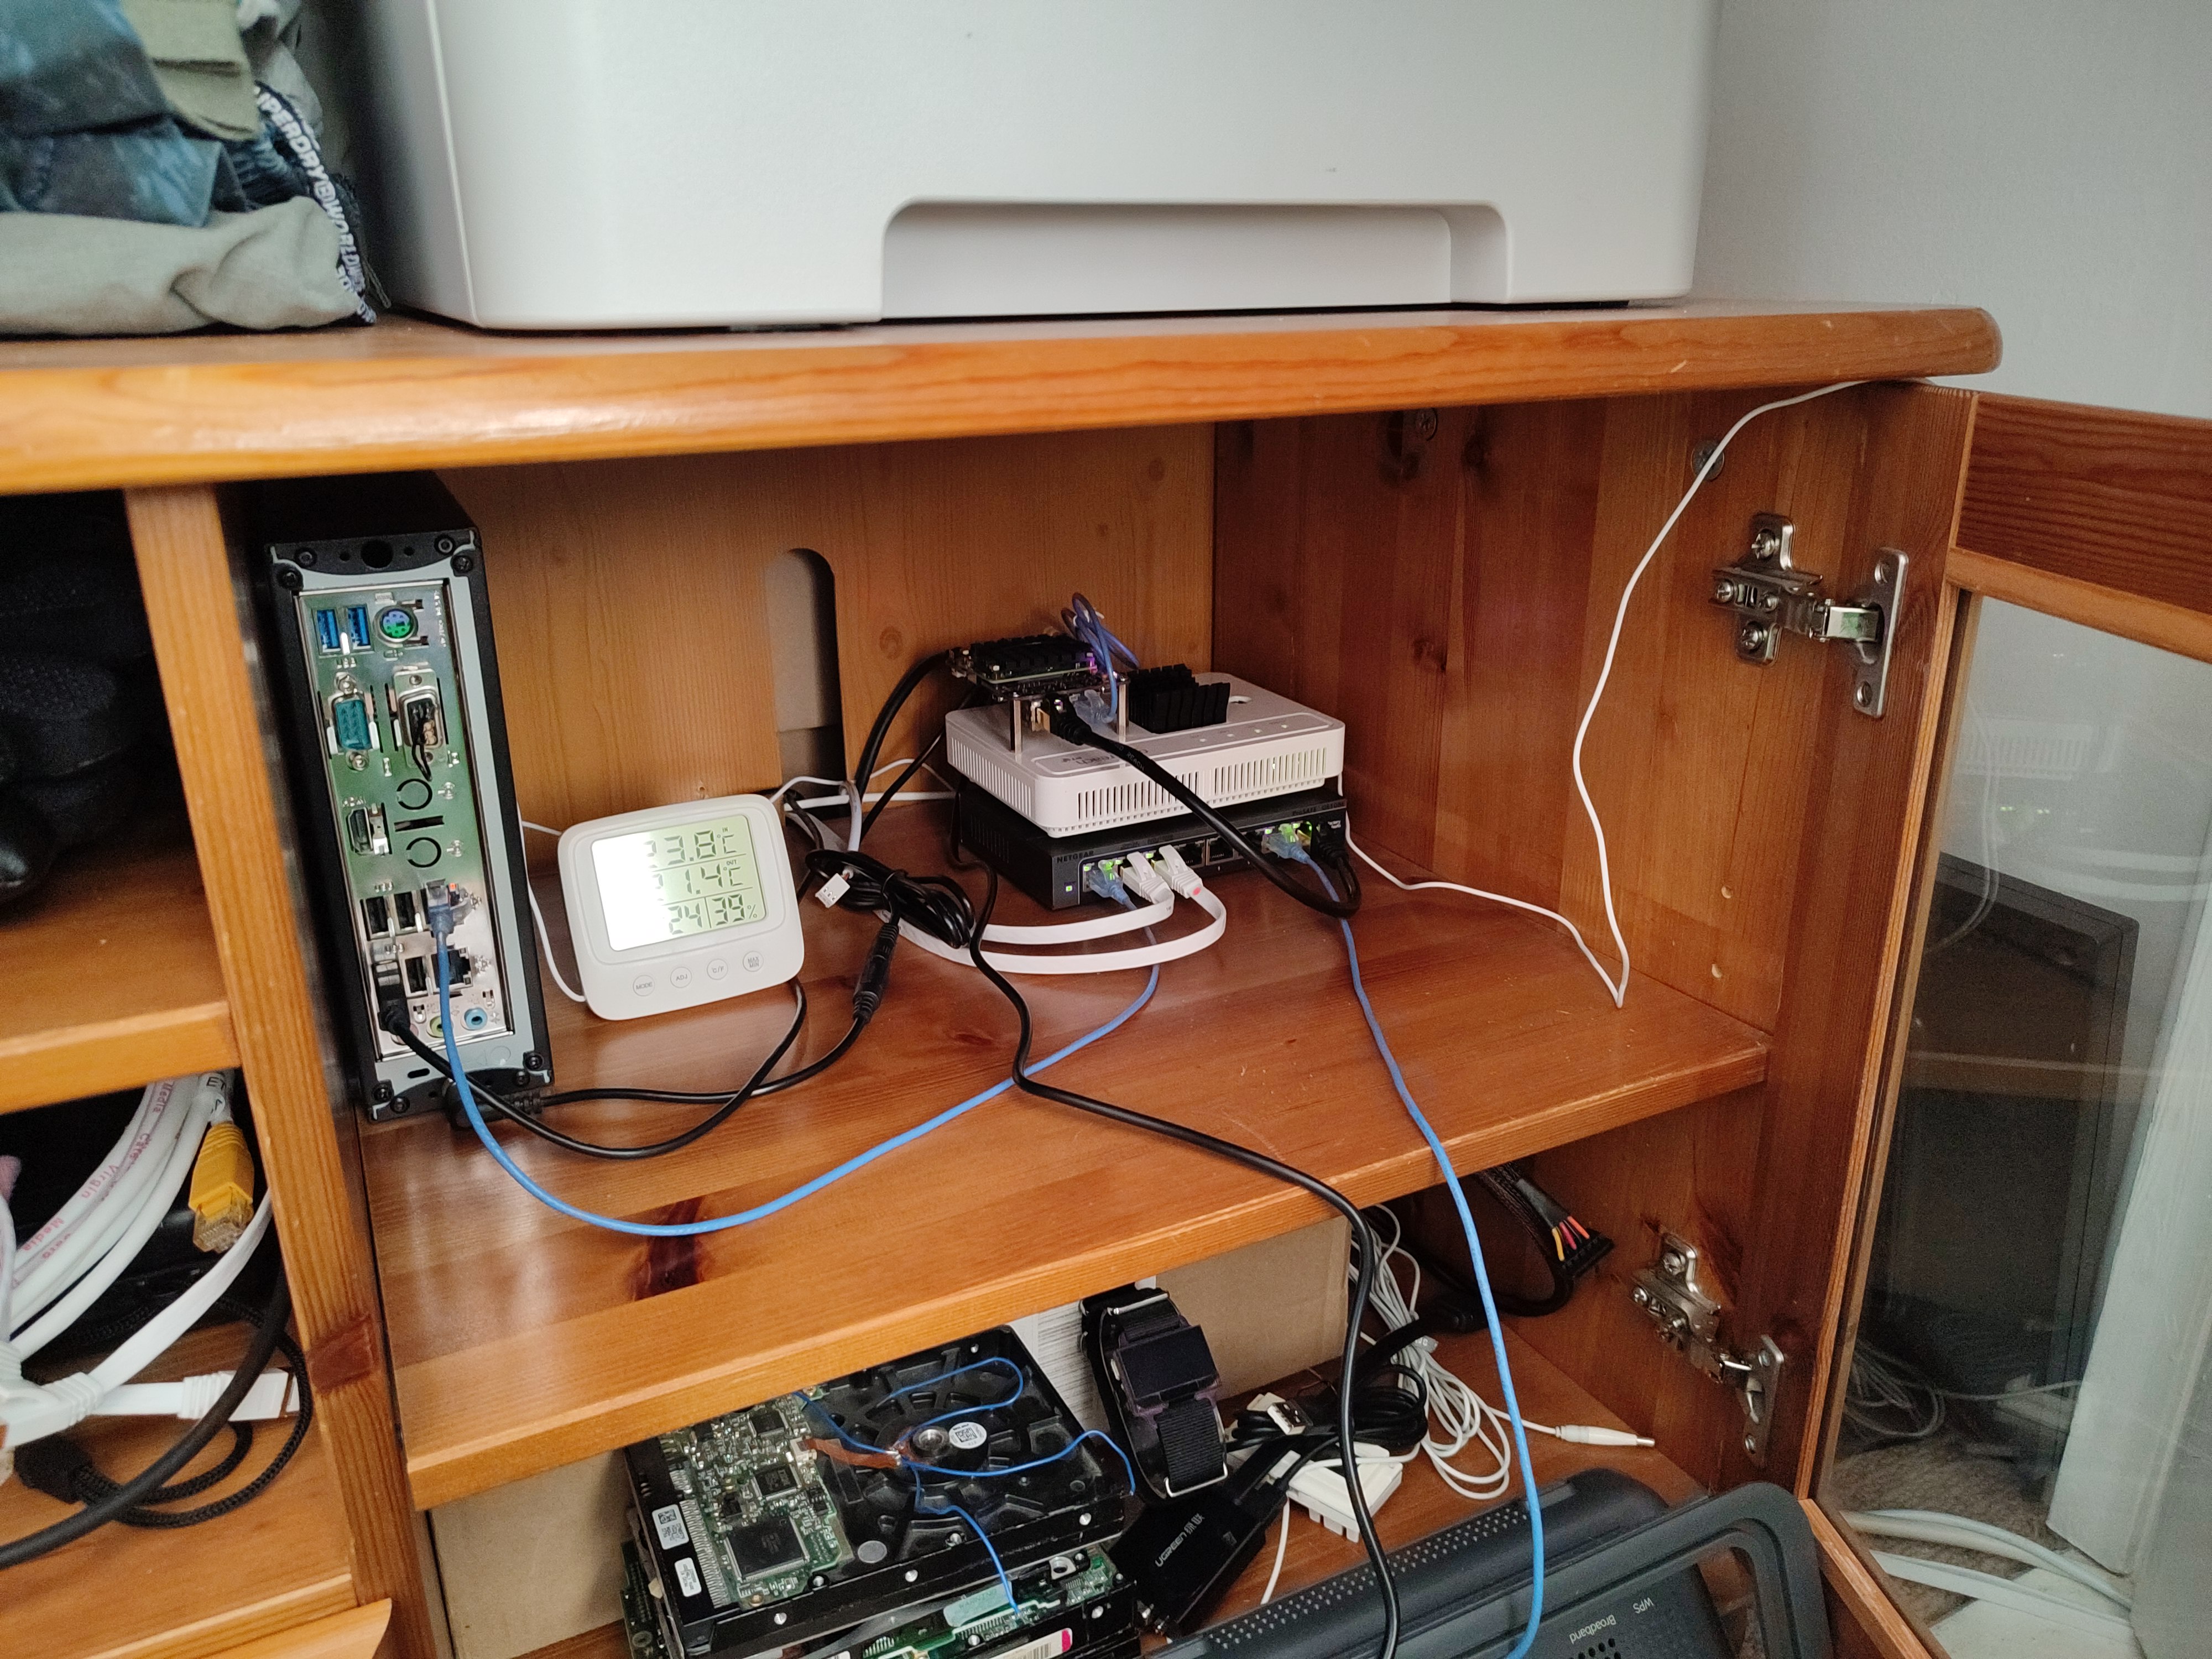
Franken-Network
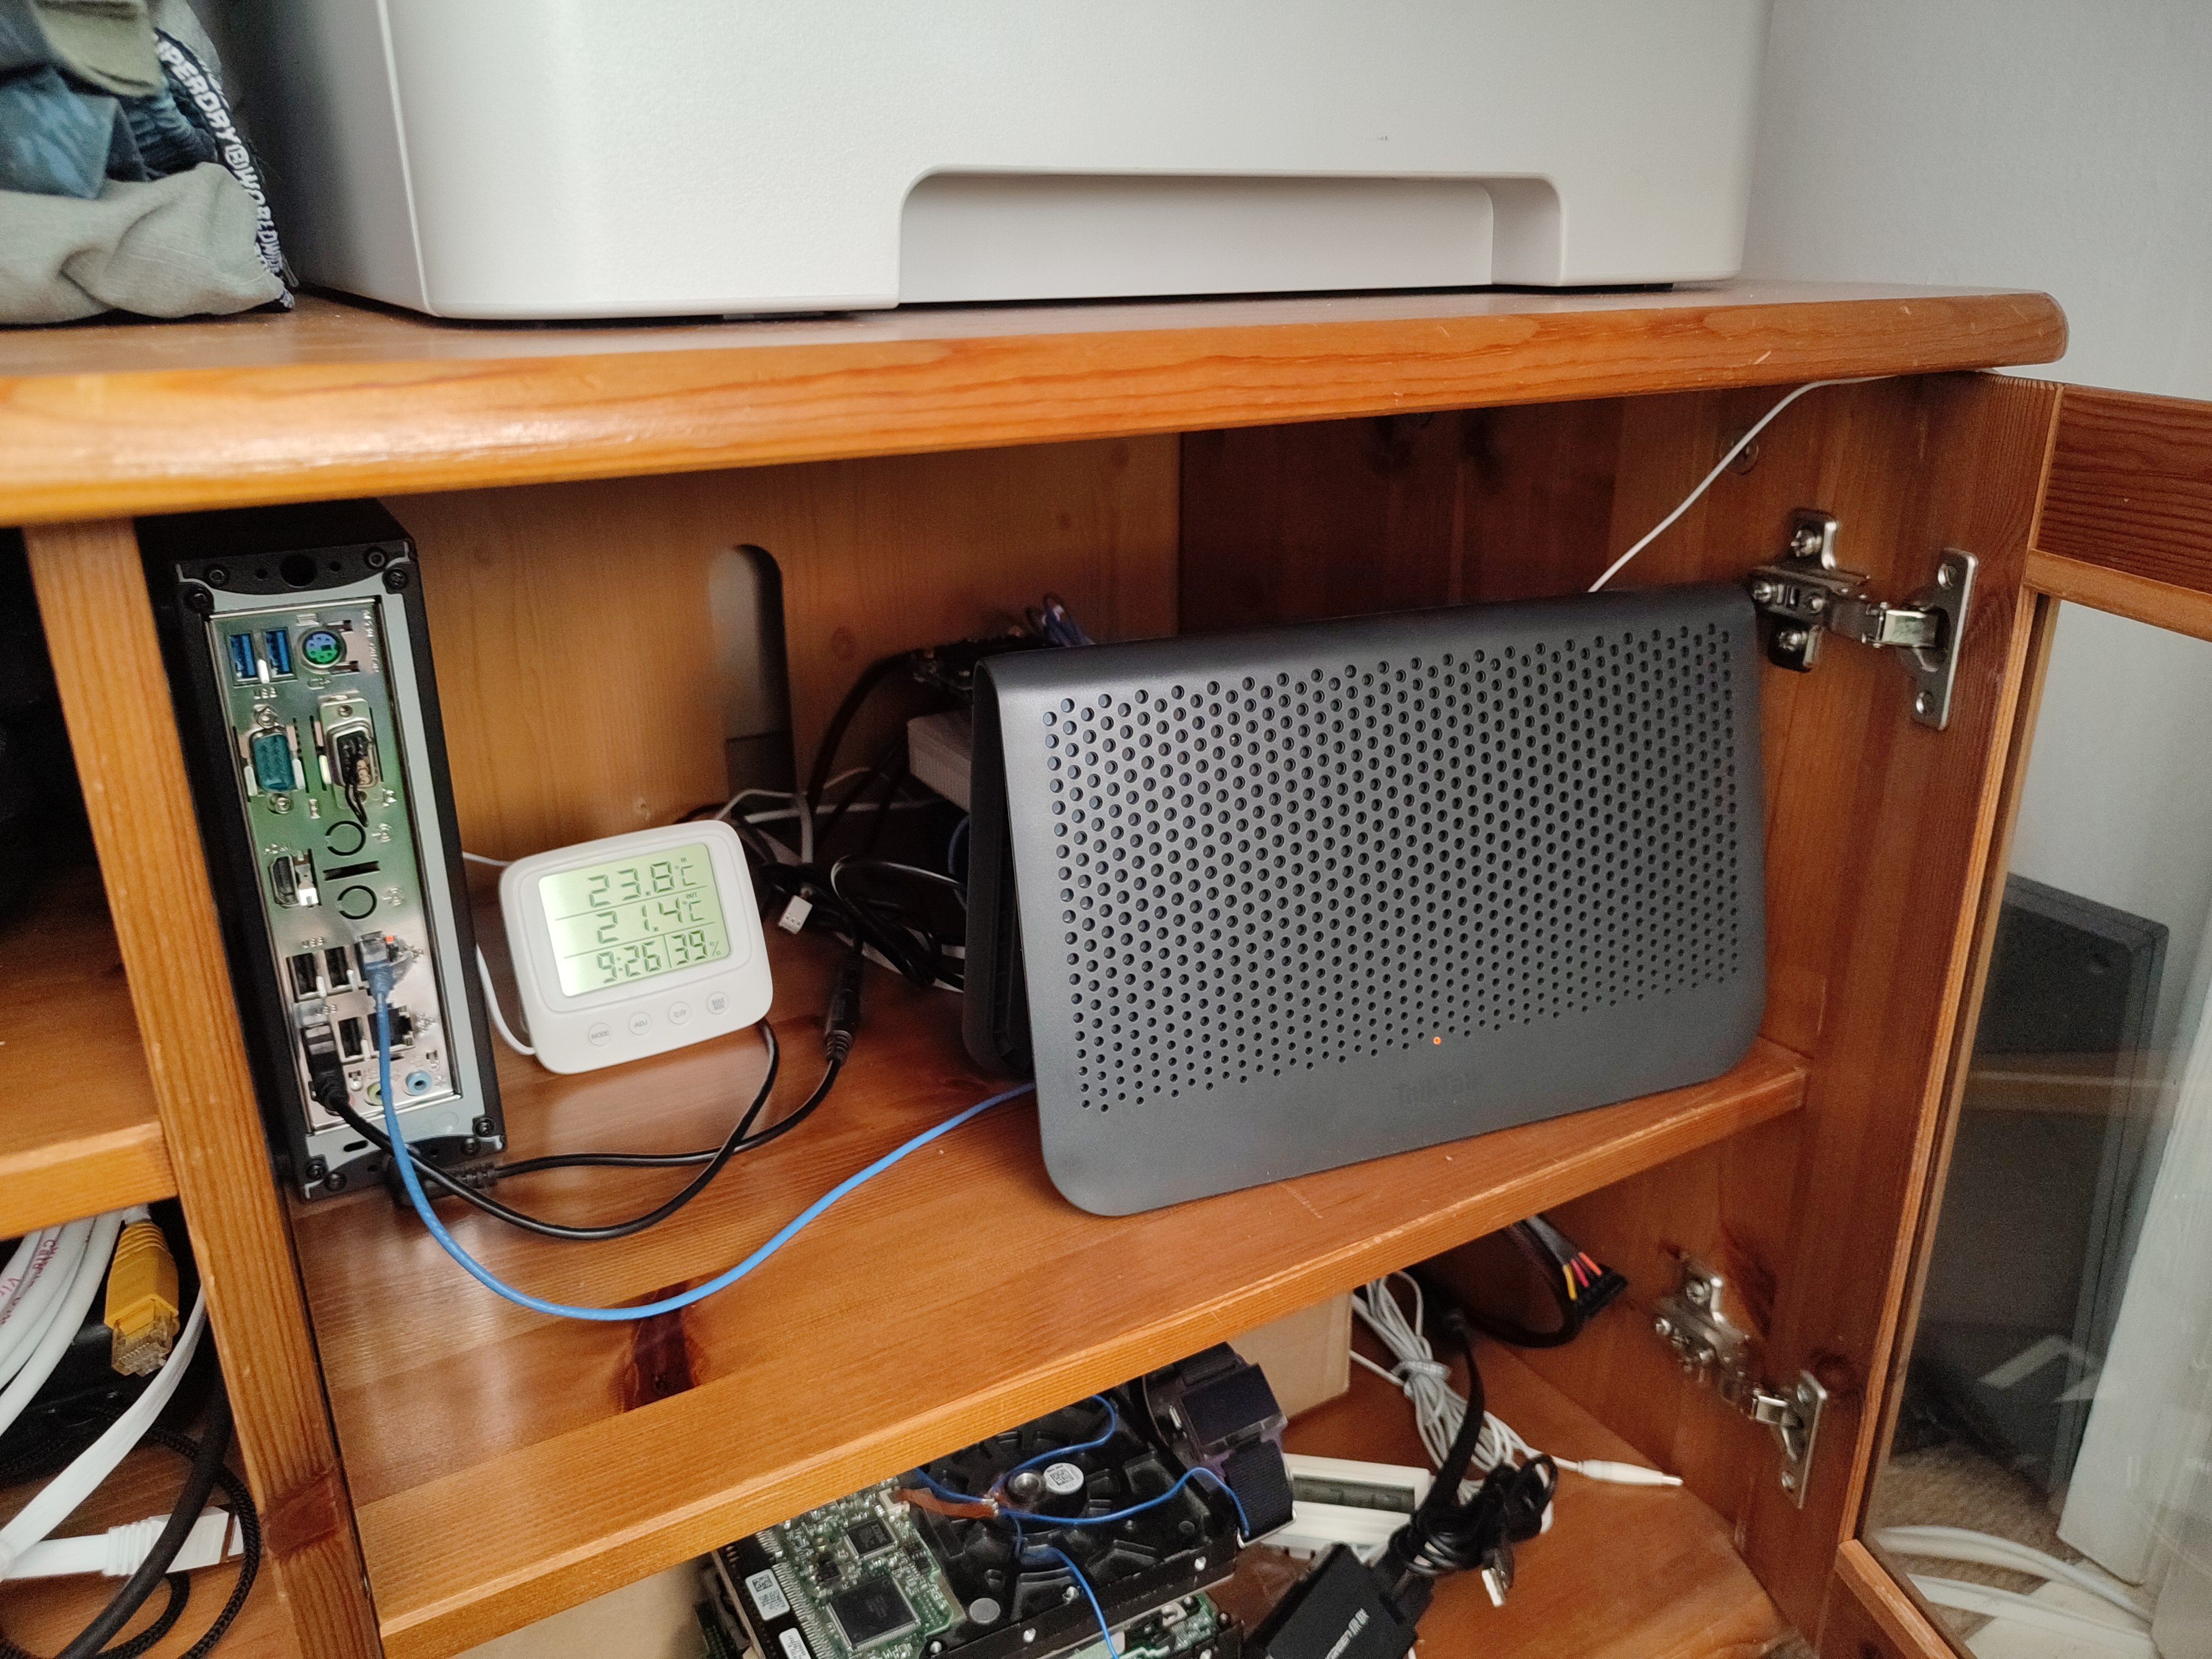
As for the rest of the network, I have a Huawei HG612 3B VDSL fibre modem and Netgear GS108E switch screwed together with the RouterPi screwed at the top. The WiFi AP is usually whatever router my ISP provides at the time, configured solely as an access point, which is currently a Huawei DG8041W. The HG612 modem is old and power-hungry at around 6W, but keeps a very stable connection and provides a bunch of useful line stats. I also upgraded the modems heatsink to try and keep it going for as long as possible since they have been known to die from overheating problems.
The Intel N3050 system has been upgraded with an SSD and replaces an even more power-hungry server which had an under-volted and under-clocked AMD Athlon X2 4450e and a mechanical hard drive that idled at 24W.
You can find all of the designs and config files over on my GitHub.


Comments